After you install Enterprise Portal, enable Web Server (HTTP) in Windows
Firewall. If you do not enable the web server in Windows Firewall, you can view
the site on the local server, but no other users can view the site. By default, when
you enable Web Server (HTTP) through the firewall, you enable port 80. If you
configured the Enterprise Portal site for a port other than port 80, enable that port
in Windows Firewall.
Regards,
Hossein Karimi
AX,365,NAV(tutorials: tips and tricks)
Tuesday, July 31, 2018
Configure the Firewall on the Enterprise Portal Server
 +10 years of experience with hands-on lead-level background in the full life cycle of software development with demonstrated cross-functional team leadership skills.
Programming:
• ERP :Microsoft Dynamics AX 2012
• Language :X++, C#, C++, XAML, Asp.Net, Html, VB.Net, Android
• Environment : Windows XP, Windows 8, Windows 10, Windows Server
• DataBase : Oracle 9i,10g,11g and SqlServer and SQLlite
+10 years of experience with hands-on lead-level background in the full life cycle of software development with demonstrated cross-functional team leadership skills.
Programming:
• ERP :Microsoft Dynamics AX 2012
• Language :X++, C#, C++, XAML, Asp.Net, Html, VB.Net, Android
• Environment : Windows XP, Windows 8, Windows 10, Windows Server
• DataBase : Oracle 9i,10g,11g and SqlServer and SQLlite
Configure Files for Sites in a Web Farm
If your Enterprise Portal site is not a part of a web farm, skip this procedure. Use
the following procedure to specify values for machineKey properties in the
web.config file of each server in the web farm. MachineKey properties
(validationKey and decryptionKey) are used for hashing and decrypting
authentication tickets and cookies. Values for machineKey properties must be the
same on all servers in the web farm. If they are not, Enterprise Portal pages might
display authentication and access errors.
1. On the web farm administration server, open the web.config file in a
text editor such as Notepad. By default, the file is located in the
following directory:
C:\Inetpub\wwwroot\wss\VirtualDirectories\PortNumber.
2. Locate the machineKey section and copy the validationKey and
decryptionKey values to a separate text file. The following is an
example of a machineKey section:
<machineKey
validationKey="4785A9C8F5FA32B47E5245AC48671291F1CE55
735A475EB7"
decryptionKey="D961976E181646326D64E01AB2052F5D076F0A
BDE2C702FB" validation="SHA1" />
3. Edit the web.config files on the other servers in the web farm.
Replace the existing machineKey values with the values that you
copied from the web farm administration server.
For more information about how to configure machineKey properties, refer to
How to: Configure MachineKey in ASP.Net 2.0
(http://go.microsoft.com/fwlink/?LinkId=117441), and specifically read the
section called "Web Farm Deployment Considerations."
Regards,
Hossein Karimi
+10 years of experience with hands-on lead-level background in the full life cycle of software development with demonstrated cross-functional team leadership skills.
Programming:
• ERP :Microsoft Dynamics AX 2012
• Language :X++, C#, C++, XAML, Asp.Net, Html, VB.Net, Android
• Environment : Windows XP, Windows 8, Windows 10, Windows Server
• DataBase : Oracle 9i,10g,11g and SqlServer and SQLlite
Install Enterprise Portal and Role Centers
Use the following procedure to install Enterprise Portal and Role Centers using
Setup on a server that includes either Microsoft SharePoint Foundation 2010 or
Microsoft SharePoint Server 2010.
1. Start Microsoft Dynamics AX Setup.
2. Step through the initial wizard pages.
3. On the Modify Microsoft Dynamics AX installation page, selectAdd or modify components. Click Next.
4. On the Add or modify components page, expand Server
Components, expand Web Server Components, select Enterprise
Portal (EP). Click Next.
5. On the Prerequisite validation page verify that the prerequisites are
installed and when all the errors are resolved, click Next.
6. In Domain\user name, type "CONTOSO\SQLService".
7. In Password, type "Pa$$w0rd", then click Next.
8. On the Configure a Web site for Enterprise Portal page, select a
web site. If no web sites are available in the list, you must cancel
Setup, create a web site by using SharePoint Central Administration,
and then try the installation again.
9. In Site URL, type "DynamicsAxTestInstall". Click Next.
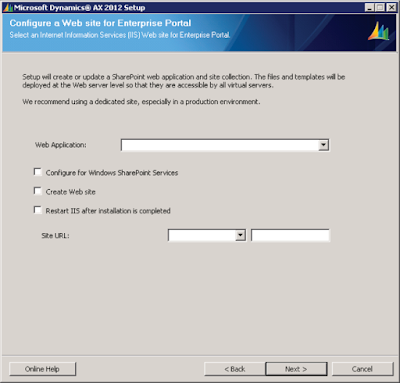
BEST PRACTICE: It is recommend that you select the Configure for Windows
SharePoint Services option. If you select this option, Setup verifies that the site is
a SharePoint site. If it is not a SharePoint site, Setup extends the site in
SharePoint. Setup also sets the application pool to run under the service account
and sets the authentication method to Windows NTLM.
IMPORTANT: Note the following important information about the Create Web
site option:
Clear this option if you are installing Enterprise Portal for a public site, such as
an unsolicited vendor portal. For public sites, you must create the Enterprise
Portal site by using the public site template.
If you are installing Enterprise Portal for a stand-alone installation, or on an
administration server for a Web farm, select the Create Web site option to create
a site at the following URL: http://ServerName/sites/DynamicsAX. Setup creates
a new site that uses port 80.
When you install Enterprise Portal on subsequent servers in a server farm, you
must clear this option. The site must be created only on the administration server
for the Web farm.
10. On the Prerequisite Validation page, click Next.
NOTE: If your business or organization purchased a Microsoft Dynamics AX
developer license, you can change the web site URL, title, and description before
completing the installation by modifying the EPSetupParams file in the
Application Object Tree (AOT) by opening Web > Web Files > Static Files >EPSetupParams.
11. On the Ready to install page, click Install.
12. If appropriate, select the option to restart IIS when the installation is
complete. Before you select this option, consider the effect of an IIS
reset on other applications on the web server.
13. Complete the wizard.
14. Repeat this procedure on every web server in the server farm.
NOTE: By default, Setup creates a site on port 80 when you install Enterprise
portal. However, you can create additional sites. For more information, refer to
Create an Enterprise Portal Site (http://technet.microsoft.com/enus/library/dd362092(AX.60).aspx)page on TechNet.
Regards,
Hossein Karimi
+10 years of experience with hands-on lead-level background in the full life cycle of software development with demonstrated cross-functional team leadership skills.
Programming:
• ERP :Microsoft Dynamics AX 2012
• Language :X++, C#, C++, XAML, Asp.Net, Html, VB.Net, Android
• Environment : Windows XP, Windows 8, Windows 10, Windows Server
• DataBase : Oracle 9i,10g,11g and SqlServer and SQLlite
Users and Communication
In Microsoft Dynamics AX, Enterprise Portal users, or Web users, can be any of
the following individuals:
• Employees who access Microsoft Dynamics AX through an intranet
or an extranet
• Customer or vendors who access Microsoft Dynamics AX through
an extranet
• Unsolicited vendors who want to sign up to be vendors, and who
access Microsoft Dynamics AX through a public Internet site
• All Web users access Microsoft Dynamics AX through Enterprise
Portal.
Note the following information about Enterprise Portal client connections and
communications:
• All browser-based clients and Microsoft Dynamics AX clients access
Role Centers through Enterprise Portal. Microsoft Dynamics AX
clients use a browser control to display Role Centers.
• Enterprise Portal uses the Report Web part to display reports that
exist on the SQL Server Reporting Services server.
• Enterprise Portal uses ASP.NET user controls and the Enterprise
Portal framework to display Microsoft Dynamics AX data and
reports.
• Enterprise Portal uses Windows Communication Framework (WCF)
and .NET Business Connector to interact with an Application Object
Server (AOS).
The language that is used in the user interface for Enterprise Portal is determined
by the user interface language that is specified for each user in the Microsoft
Dynamics AX client. The user interface language also determines how values are
formatted.
Regards,
Hossein Karimi
+10 years of experience with hands-on lead-level background in the full life cycle of software development with demonstrated cross-functional team leadership skills.
Programming:
• ERP :Microsoft Dynamics AX 2012
• Language :X++, C#, C++, XAML, Asp.Net, Html, VB.Net, Android
• Environment : Windows XP, Windows 8, Windows 10, Windows Server
• DataBase : Oracle 9i,10g,11g and SqlServer and SQLlite
Customizing Enterprise Portal
Enterprise Portal is built on ASP.NET. All Enterprise Portal objects are located
in the Web node of the Application Object Tree (AOT).
Microsoft Dynamics AX includes a standard Web part that can host a User
Control. Developers can write or modify User Controls in Microsoft Visual
Studio. User Controls are used to present Microsoft Dynamics AX content on a
page, and they are the primary way to add new functionality to Enterprise Portal.
Regards,
Hossein Karimi
+10 years of experience with hands-on lead-level background in the full life cycle of software development with demonstrated cross-functional team leadership skills.
Programming:
• ERP :Microsoft Dynamics AX 2012
• Language :X++, C#, C++, XAML, Asp.Net, Html, VB.Net, Android
• Environment : Windows XP, Windows 8, Windows 10, Windows Server
• DataBase : Oracle 9i,10g,11g and SqlServer and SQLlite
Enterprise Portal
This topic introduces concepts that pertain to the architecture of Enterprise Portal
for Microsoft Dynamics AX. The topic also describes the various components of
the Enterprise Portal architecture.
Sites and Pages
An Enterprise Portal site consists of a root SharePoint 2010 products site and
collections of sub sites. The subsites approximate the features and functionality
of the modules in the Microsoft Dynamics AX client. For a detailed description
of each Enterprise Portal module, and the common tasks, features, and reports
that are available in each module, refer to the Overview of Enterprise Portal for
Microsoft Dynamics AX topic on TechNet.
An Enterprise Portal page can include standard Microsoft Dynamics AX Web
parts, such as the toolbar, or User Control Web parts that display Microsoft
Dynamics AX data. An Enterprise Portal page can also include standard
SharePoint 2010 products Web parts, such as lists, announcements, and
discussions. Users can modify these Web parts as needed. If you set up and
configure Enterprise Portal with Role Centers, Role Center pages can include the
following elements:
• Cues that provide a visual representation of records based on the
status of the records. For example, there can be cues for pending
sales orders or items that are on backorder.
• Key performance indicators (KPIs) that provide information from
predefined data cubes. You can use this information to monitor
business performance against a defined goal.
• A Report Web part that provides access to SQL Server Reporting
Services reports.
• A Business Overview Web part that displays historical performance,
such as year-over-year performance or month-over-month
performance.
• A work list that displays action items that are generated either by a
workflow or by an alert, according to business needs.
• Community links that provide access to items that are published on
community sites for Finance, Services, and Sales and Marketing.
• Links that provide access to important internal and external sites.
Regards,
Hossein Karimi
+10 years of experience with hands-on lead-level background in the full life cycle of software development with demonstrated cross-functional team leadership skills.
Programming:
• ERP :Microsoft Dynamics AX 2012
• Language :X++, C#, C++, XAML, Asp.Net, Html, VB.Net, Android
• Environment : Windows XP, Windows 8, Windows 10, Windows Server
• DataBase : Oracle 9i,10g,11g and SqlServer and SQLlite
Configure security settings in Reporting Services
Complete the following tasks in Reporting Services:
• Assign users to the DynamicsAXBrowser role in Reporting Services.
For detailed instructions about how to assign users to Reporting
Services roles, refer to the SQL Server documentation on MSDN.
• Identify the account that is used to run the Application Object Server
(AOS) service and the account that is used as the Business Connector
proxy. Assign those accounts to the DynamicsAXBrowser role in
Reporting Services. For detailed instructions about how to assign
users to Reporting Services roles, refer to the SQL Server
documentation on MSDN.
• Restrict access to report folders and reports. Reporting Services
includes security features and tools that you should use to help
control access to report folders and published reports. Refer to the
SQL Server documentation on MSDN for detailed conceptual
information and step-by-step tutorials that will help you administer
security in Reporting Services.
Regards,
Hossein Karimi
+10 years of experience with hands-on lead-level background in the full life cycle of software development with demonstrated cross-functional team leadership skills.
Programming:
• ERP :Microsoft Dynamics AX 2012
• Language :X++, C#, C++, XAML, Asp.Net, Html, VB.Net, Android
• Environment : Windows XP, Windows 8, Windows 10, Windows Server
• DataBase : Oracle 9i,10g,11g and SqlServer and SQLlite
Configure security settings in Microsoft Dynamics AX
Complete the following tasks in Microsoft Dynamics AX:
• Determine which reports each Microsoft Dynamics AX role should
have access to.
• Verify that each Microsoft Dynamics AX role has the correct duties
and privileges assigned to it in order to access the reports.
• Assign users to Microsoft Dynamics AX roles.
• Secure the data shown in reports.
Regards,
Hossein Karimi
+10 years of experience with hands-on lead-level background in the full life cycle of software development with demonstrated cross-functional team leadership skills.
Programming:
• ERP :Microsoft Dynamics AX 2012
• Language :X++, C#, C++, XAML, Asp.Net, Html, VB.Net, Android
• Environment : Windows XP, Windows 8, Windows 10, Windows Server
• DataBase : Oracle 9i,10g,11g and SqlServer and SQLlite
Securing Confidential Reports
Reports that contain confidential information should be secured at the data-access
level, by requiring users to provide credentials to access sensitive data. For more
information, refer to the Specifying Credential and Connection Information for
Report Data Sources (SSRS) topic on MSDN. You can also secure a folder to
make it inaccessible to unauthorized users. For more information, refer to the
Securing Folders topic on MSDN.
Grant Users Access to Reports
To grant users access to reports, you must configure security settings in
Microsoft Dynamics AX and in Microsoft SQL Server Reporting Services. The
following sections describe the tasks that you must complete in each application.
+10 years of experience with hands-on lead-level background in the full life cycle of software development with demonstrated cross-functional team leadership skills.
Programming:
• ERP :Microsoft Dynamics AX 2012
• Language :X++, C#, C++, XAML, Asp.Net, Html, VB.Net, Android
• Environment : Windows XP, Windows 8, Windows 10, Windows Server
• DataBase : Oracle 9i,10g,11g and SqlServer and SQLlite
Mitigating SQL Injection Attacks in a Parameterized Report
In any report that includes a parameter of type String, be sure to use an available
values list (also known as a valid values list) and ensure that any user running the
report has only the permissions required to view the data in the report. When you
define a parameter of type String, the user is presented with a text box that can
take any value. An available values list limits the values that can be entered. If
the report parameter is tied to a query parameter and you do not use an available
values list, it is possible for a report user to type SQL syntax into the text box,
potentially opening the report and your server to a SQL injection attack. If the
user has sufficient permissions to execute the new SQL statement, it may
produce unwanted results on the server.
If a report parameter is not tied to a query parameter and the parameter values are
included in the report, it is possible for a report user to type expression syntax or
a URL into the parameter value and render the report to Excel or HTML. If
another user then views the report and clicks the rendered parameter contents, the
user may inadvertently execute the malicious script or link.
To mitigate the risk of inadvertently running malicious scripts, open rendered
reports only from trusted sources.
Regards,
Hossein Karimi
+10 years of experience with hands-on lead-level background in the full life cycle of software development with demonstrated cross-functional team leadership skills.
Programming:
• ERP :Microsoft Dynamics AX 2012
• Language :X++, C#, C++, XAML, Asp.Net, Html, VB.Net, Android
• Environment : Windows XP, Windows 8, Windows 10, Windows Server
• DataBase : Oracle 9i,10g,11g and SqlServer and SQLlite
Mitigating Script Injection Attacks in a Hyperlink in a Published Report or Document
Reports can contain embedded hyperlinks in the value of the Action property on
a report item or part of a report item. Hyperlinks can be bound to data that is
retrieved from an external data source when the report is processed. If a
malicious user modifies the underlying data, the hyperlink might be at risk for
scripting exploits. If a user clicks the link in the published or exported report,
malicious script could run.
To mitigate the risk of including links in a report that inadvertently run malicious
scripts, only bind hyperlinks to data from trusted sources. Verify that data from
the query results and the expressions that bind data to hyperlinks do not create
links that can be exploited. For example, do not base a hyperlink on an
expression that concatenates data from multiple dataset fields. If necessary,
browse to the report and use "View Source" to check for suspicious scripts and
URLs.
Regards,
Hossein Karimi
+10 years of experience with hands-on lead-level background in the full life cycle of software development with demonstrated cross-functional team leadership skills.
Programming:
• ERP :Microsoft Dynamics AX 2012
• Language :X++, C#, C++, XAML, Asp.Net, Html, VB.Net, Android
• Environment : Windows XP, Windows 8, Windows 10, Windows Server
• DataBase : Oracle 9i,10g,11g and SqlServer and SQLlite
Report Parameters and Script Injection
Report Parameters provide flexibility for the overall report design and execution.
However, this same flexibility can, in some cases be used by an attacker in luring
attacks. To mitigate the risk of inadvertently running malicious scripts, only open
rendered reports from trusted sources. It is recommended you consider the
following scenario that is a potential HTML Renderer script injection attack:
1. A report contains a text box with the hyperlink action set to the value
of a parameter which could contain malicious text.
2. The report is published to a report server or otherwise made available
in such a way that the report parameter value can be controlled from
the URL of a web page.
3. An attacker creates a link to the web page or report server specifying
the value of the parameter in the form "javascript:<malicious script
here>" and sends that link to someone else in a luring attack.
Regards,
Hossein Karimi
+10 years of experience with hands-on lead-level background in the full life cycle of software development with demonstrated cross-functional team leadership skills.
Programming:
• ERP :Microsoft Dynamics AX 2012
• Language :X++, C#, C++, XAML, Asp.Net, Html, VB.Net, Android
• Environment : Windows XP, Windows 8, Windows 10, Windows Server
• DataBase : Oracle 9i,10g,11g and SqlServer and SQLlite
Mitigating HTML Injection Attacks in a Published Report or Document
In Reporting Services, reports and resources are processed under the security
identity of the user who is running the report. If the report contains expressions,
script, custom report items, or custom assemblies, the code runs under the user's
credentials. If a resource is an HTML document that contains script, the script
will run when the user opens the document on the report server. The ability to run
script or code within a report is a powerful feature that comes with a certain level
of risk. If the code is malicious, the report server and the user who is running the
report are vulnerable to attack.
When granting access to reports and to resources that are processed as HTML, it
is important to remember that reports are processed in full trust and that
potentially malicious script might be sent to the client. Depending on browser
settings, the client will execute the HTML at the level of trust that is specified in
the browser.
You can mitigate the risk of running malicious script by taking the following
precautions:
• Be selective when deciding who can publish content to a report
server. Because the potential for publishing malicious content exists,
you should limit users who can publish content to a small number of
trusted users.
• All publishers should avoid publishing reports and resources that
come from unknown or untrusted sources. If necessary, open the file
in a text editor and look for suspicious script and URLs.
Regards,
Hossein Karimi
+10 years of experience with hands-on lead-level background in the full life cycle of software development with demonstrated cross-functional team leadership skills.
Programming:
• ERP :Microsoft Dynamics AX 2012
• Language :X++, C#, C++, XAML, Asp.Net, Html, VB.Net, Android
• Environment : Windows XP, Windows 8, Windows 10, Windows Server
• DataBase : Oracle 9i,10g,11g and SqlServer and SQLlite
Role-Based Access to Reports and Resources
To grant access to reports and resources, you can allow users to inherit existing
role assignments from a parent folder or create a new role assignment on the item
itself.
In most cases, you will probably want to use the permissions that are inherited
from a parent folder. Setting security on individual reports and resources should
only be necessary if you want to hide the report or resource from users who do
not need to know that the report or resource exists, or to increase the level of
access for a report or item. These objectives are not mutually exclusive. You can
restrict access to a report to a smaller set of users, and provide all or some of
them with additional privileges to manage the report.
You may need to create multiple role assignments to achieve your objectives. For
example, suppose you have a report that you want to make accessible to two
users, Ann and Fernando, and to the Human Resource Managers group. Ann and
Fernando must be able to manage the report, but the Human Resource Managers
members need only to run it. To accommodate all of these users, you would
create three separate role assignments: one to make Ann a content manager of the
report, one to make Fernando a content manager of the report, and one to support
view-only tasks for the Human Resource Managers group.
Once you set security on a report or resource, those settings stay with the item
even if you move the item to a new location. For example, if you move a report
that only a few people are authorized to access, the report continues to be
available to just those users even if you move it to a folder that has a relatively
open security policy.
Regards,
Hossein Karimi
+10 years of experience with hands-on lead-level background in the full life cycle of software development with demonstrated cross-functional team leadership skills.
Programming:
• ERP :Microsoft Dynamics AX 2012
• Language :X++, C#, C++, XAML, Asp.Net, Html, VB.Net, Android
• Environment : Windows XP, Windows 8, Windows 10, Windows Server
• DataBase : Oracle 9i,10g,11g and SqlServer and SQLlite
Monday, July 30, 2018
Assembly Access on a Report Server
If an administrator grants an assembly access to the SessionManager API (which
wraps .NET Business Connector), then the assembly must be given the
AxSessionPermissionSet in the rssrvpolicy.config file on the report server.
NOTE: This is the recommended setting for business logic assemblies
(depending on the main report project name length, either .BusinessLogic.dll or
.BL.dll), and it is added by default for the business logic assemblies that are
created for a deployed reporting project. This includes the business logic
assemblies from referenced reporting projects.
Giving a custom assembly full trust in the report server security policy file allows
the assembly to directly access .NET Business Connector running under the
Business Connector proxy account. This is an account that has elevated
privileges that allows for access to the LogonAs functionality. In this case, the
assembly could impersonate any user and access their records.
Granting a custom assembly ReflectionPermission with MemberAccess could
allow the assembly to retrieve cached sessions from the session cache. Those
sessions are logged in for a specific user, and the custom assembly could have
access to that user's data.
The following code must be present in the custom code section of the RDL file if
the report is expected to make use of the SessionManager API:
Protected Overrides Sub OnInit()
Microsoft.Dynamics.Framework.Reports.SessionManager.BeginRequest(Report)
End Sub
Entries in the security policy file will not be created for any assemblies
referenced by business logic assemblies.
Regards,
Hossein Karimi
+10 years of experience with hands-on lead-level background in the full life cycle of software development with demonstrated cross-functional team leadership skills.
Programming:
• ERP :Microsoft Dynamics AX 2012
• Language :X++, C#, C++, XAML, Asp.Net, Html, VB.Net, Android
• Environment : Windows XP, Windows 8, Windows 10, Windows Server
• DataBase : Oracle 9i,10g,11g and SqlServer and SQLlite
Projects and Builds Reporting
When building a project from the command line, Microsoft Dynamics AX
reporting tools does not perform any checks for unsafe entries in the project file.
The project file entries are not analyzed by Microsoft Dynamics AX reporting
tools from a security perspective. Therefore, it is strongly recommended that you
do not build third-party reporting projects from the command line. Build from the
command line only in trusted scenarios.
Microsoft Visual Studio, with the help of MSBuild, analyzes unsafe entries in a
project file when it is loaded and warns you about them. An example of an unsafe
entry is the redirection of the project output path to a system folder. For example,
the output path could be redirected to C:\Windows, which could overwrite a
system file. Or, the output path could be redirected so as to overwrite a default
MSBuild property for Microsoft Dynamics AX reporting tools projects. When
attempting to open a reporting project that contains unsafe entries, a dialog box
displays that prompts you not to open the project. If you experience this, you
should inspect the unsafe entries as you decide whether to open the project.
Project files, model files, code files, and referenced assemblies should always be
placed in a safe location whether it is a local folder, network share, or source
code control database. The default project location for Microsoft Visual Studio
projects is \My Documents\Visual Studio 2010\Projects, which is protected by
the administrator and current user access control lists.
Threat detection in a business logic project is limited to the functionality
provided by standard C# and Visual Basic project systems in Microsoft Visual
Studio. The current implementation of the C# and Visual Basic project systems
displays only the first detected threat in the project file. Therefore, if you skip the
threat and load the project file, all other threats that exist in the project file will
be skipped.
The build cache file has an internal binary structure. The first violation of this
structure that is discovered will force the compilation to regenerate the file. If the
file is modified without violating the structure, the issue will not be mitigated,
but you can invoke a clean build to regenerate the build cache file to eliminate
the threat.
Regards,
Hossein Karimi
+10 years of experience with hands-on lead-level background in the full life cycle of software development with demonstrated cross-functional team leadership skills.
Programming:
• ERP :Microsoft Dynamics AX 2012
• Language :X++, C#, C++, XAML, Asp.Net, Html, VB.Net, Android
• Environment : Windows XP, Windows 8, Windows 10, Windows Server
• DataBase : Oracle 9i,10g,11g and SqlServer and SQLlite
Data Access Reporting
When accessing data from the Microsoft Dynamics AX database, it is
recommended that you use the predefined Microsoft Dynamics AX data sources
to ensure that appropriate security is enforced. For more information about the
predefined Dynamics AX data source, refer to Securing Reports and Resources
on MSDN and Securing Reporting Services in SQL Server 2008 Books Online.
Regards,
Hossein Karimi
+10 years of experience with hands-on lead-level background in the full life cycle of software development with demonstrated cross-functional team leadership skills.
Programming:
• ERP :Microsoft Dynamics AX 2012
• Language :X++, C#, C++, XAML, Asp.Net, Html, VB.Net, Android
• Environment : Windows XP, Windows 8, Windows 10, Windows Server
• DataBase : Oracle 9i,10g,11g and SqlServer and SQLlite
Configure Report Servers
When you install the business intelligence components for Microsoft Dynamics
AX 2012, setup will automatically create a report server configuration. Setup
uses the information provided in the wizard to set the parameters in each field.
You can use the Report server form to manage Microsoft Dynamics AX AOS
connections to a Microsoft SQL Server Reporting Services instance. This might
be necessary for example when setting up a test environment, or after you refresh
the data in a test from a production you must configure the report server to make
sure that the reporting servers are configured to point to the correct test servers
instead of the production servers.
Open System administration > Setup > Business Intelligence > Reporting Services > Report servers.

To configure a report server, follow these steps.
1. Open System administration > Setup > Business intelligence > Reporting Services > Report servers.
2. Either click New to create a new report server, or select the desired
report server to modify. You can use the Use default settings button
to reset the Report Manager URL, Web service URL, andMicrosoft Dynamics AX report folder fields to their default entries.
3. Enter a name to identify the Reporting Services and AOS instances
that you are connecting in the Configuration ID field.
4. Enter a brief description to help you identify the Reporting Services
and AOS instances that you are connecting in the Description field.
5. Select the Default configuration check box if the Reporting
Services instance specified in this configuration is the default report
server for the AOS instance.
6. Enter the name of the server on which Reporting Services is
installed.
7. Enter the name of the Reporting Services instance.
8. Enter the URL of the Report Manager website. The default URL is
http://SSRSServerName/reports.
9. Enter the URL of the Reporting Services web service. The default
URL is http://SSRSServerName/reportserver.
10. Enter a name for the folder that will be created on the Report
Manager website in the Microsoft Dynamics AX report folderfield. If a folder does not exist, you can use the Create report folderbutton to create the folder.
11. Select an AOS instance.
12. When you are finished making changes, click Validate settings to
verify that the AOS instance can communicate with the Reporting
Services instance.
Regards,
Hossein Karimi
+10 years of experience with hands-on lead-level background in the full life cycle of software development with demonstrated cross-functional team leadership skills.
Programming:
• ERP :Microsoft Dynamics AX 2012
• Language :X++, C#, C++, XAML, Asp.Net, Html, VB.Net, Android
• Environment : Windows XP, Windows 8, Windows 10, Windows Server
• DataBase : Oracle 9i,10g,11g and SqlServer and SQLlite
Deploy Reports in PowerShell
After you have loaded the Microsoft Dynamics AX PowerShell module and
retrieved a list of reports, you can deploy the reports. The Publish-AXReport
cmdlet is used to deploy the reports. The following examples show you how to
use this cmdlet.
1. To deploy a specific report, enter the name of the report. For
example, the following command is used to deploy the
CustTransList report: "Publish-AXReport -ReportName
CustTransList", and then press Enter.
2. To deploy two or more specific reports, enter the names of the
reports. For example, the following command is used to deploy the
CustTransList and CustTransOpenPerDate reports: "PublishAXReport -ReportName CustTransList, CustTransOpenPerDate", and then press Enter.
3. To deploy all reports, enter the following command: "PublishAXReport –ReportName *", and then press Enter.
Regards,
Hossein Karimi
+10 years of experience with hands-on lead-level background in the full life cycle of software development with demonstrated cross-functional team leadership skills.
Programming:
• ERP :Microsoft Dynamics AX 2012
• Language :X++, C#, C++, XAML, Asp.Net, Html, VB.Net, Android
• Environment : Windows XP, Windows 8, Windows 10, Windows Server
• DataBase : Oracle 9i,10g,11g and SqlServer and SQLlite
Filter a List of Reports in PowerShell
In the previous procedure, you displayed a list of all the Microsoft Dynamics AX
default reports that you can deploy. This procedure will help you filter the list.
1. Modify the list so that only the Name and ChangedDate fields are
displayed by entering the following command: "$reports | SelectObject Name,ChangedDate" and then press Enter.
2. Modify the list so that only specific reports are listed. For example,
to filter the list so that only the reports that contain the wordCustTrans are listed, enter the following command: "$reports |
Select-Object Name,ChangedDate | Where { $_.Name -like
"CustTrans*" }", and then press Enter.
Regards,
Hossein Karimi
+10 years of experience with hands-on lead-level background in the full life cycle of software development with demonstrated cross-functional team leadership skills.
Programming:
• ERP :Microsoft Dynamics AX 2012
• Language :X++, C#, C++, XAML, Asp.Net, Html, VB.Net, Android
• Environment : Windows XP, Windows 8, Windows 10, Windows Server
• DataBase : Oracle 9i,10g,11g and SqlServer and SQLlite
View a List of Reports in PowerShell
Complete the following procedure to open PowerShell, load the Microsoft Dynamics AX PowerShell module, and view a list of reports.
1. Open PowerShell as an administrator by completing the following steps:
a. Open the PowerShell folder on the Start menu (Start > All Programs > Accessories > Windows PowerShell).
b. Right-click the Windows PowerShell option.
c. Click Run as administrator.
2. Enter the following command to enable PowerShell to run scripts:
"Set-ExecutionPolicy Unrestricted", and then press Enter.
3. Confirm the previous command by entering Y.
4. Load the Microsoft Dynamics AX PowerShell module by entering the following command:
TIP: It is recommend that you save this command as a script file so that you do
not have to type this command every time that you want to load the Microsoft
Dynamics AX PowerShell module. To run the script file, enter the full path of the file.
5. Enter the following command to view the list of cmdlets that are
available for use: "Get-Command -Module
Microsoft.Dynamics.AX.Framework.Management", and then press Enter.
6. Retrieve information about the default reports and enter the
following command to store that information in a local variable:
"$reports = Get-AXReport -ReportName *", and then press Enter.
7. Enter the following command to view the list of reports: "$reports"
and then press Enter.
The list contains hundreds of reports. To deploy all the reports, refer to
Procedure: Deploy Reports. To filter the list and deploy a smaller set of reports,
refer to Procedure: Filter the list of reports.
Regards,
Hossein Karimi
1. Open PowerShell as an administrator by completing the following steps:
a. Open the PowerShell folder on the Start menu (Start > All Programs > Accessories > Windows PowerShell).
b. Right-click the Windows PowerShell option.
c. Click Run as administrator.
2. Enter the following command to enable PowerShell to run scripts:
"Set-ExecutionPolicy Unrestricted", and then press Enter.
3. Confirm the previous command by entering Y.
4. Load the Microsoft Dynamics AX PowerShell module by entering the following command:
1 2 3 4 5 6 7 8 | $axmodulename ="Microsoft.Dynamics.AX.Framework.Management" $axdllname = $axmodulename + ".dll" $gacfolder = join-path $env:windir "assembly\GAC_MSIL" $axdll = Get-ChildItem $gacfolder -Recurse -Include *.dll - Name $axdllname $axdll = join-path $gacfolder $axdll write-host "Importing AX ManaSalesgement module" import-module $axdll |
TIP: It is recommend that you save this command as a script file so that you do
not have to type this command every time that you want to load the Microsoft
Dynamics AX PowerShell module. To run the script file, enter the full path of the file.
5. Enter the following command to view the list of cmdlets that are
available for use: "Get-Command -Module
Microsoft.Dynamics.AX.Framework.Management", and then press Enter.
6. Retrieve information about the default reports and enter the
following command to store that information in a local variable:
"$reports = Get-AXReport -ReportName *", and then press Enter.
7. Enter the following command to view the list of reports: "$reports"
and then press Enter.
The list contains hundreds of reports. To deploy all the reports, refer to
Procedure: Deploy Reports. To filter the list and deploy a smaller set of reports,
refer to Procedure: Filter the list of reports.
Regards,
Hossein Karimi
+10 years of experience with hands-on lead-level background in the full life cycle of software development with demonstrated cross-functional team leadership skills.
Programming:
• ERP :Microsoft Dynamics AX 2012
• Language :X++, C#, C++, XAML, Asp.Net, Html, VB.Net, Android
• Environment : Windows XP, Windows 8, Windows 10, Windows Server
• DataBase : Oracle 9i,10g,11g and SqlServer and SQLlite
Installation and Deployment Reporting
SSRS installation and deployment in Microsoft Dynamics AX 2012 has changed.
The setup utility no longer installs reporting extensions or analysis extensions,
but rather business intelligence components. For report deployment, the
Microsoft Dynamics AX 2009 Reporting Project Deployment form is replaced
with PowerShell scripts.
Installation
To install the reporting components in Microsoft Dynamics AX 2009, you had to
install the reporting extensions when running the Setup wizard. For Microsoft
Dynamics AX 2012, the Setup wizard is changed. It no longer includes an option
for installing the reporting extensions.
When you run the Setup wizard for Microsoft Dynamics AX 2012, you can
install the business intelligence components. When you install the business
intelligence components, the Setup wizard will:
• Verify that prerequisite software has been installed on your server.
• Prompt you to select a SQL Server Reporting Services instance.
• Prompt you to select a SQL Server Analysis Services instance.
NOTE: For more information about installing business intelligence components,
refer to the Analytics chapter in this course.
Deployment
Microsoft Dynamics AX includes many default reports that you must deploy to
Microsoft SQL Server Reporting Services. If you did not deploy the reports when
you installed the Business Intelligence components, you can use Windows
PowerShell to deploy the reports. The following procedures will help you deploy
the reports.
Before you can deploy the reports by using PowerShell, you must:• Verify that you are using a computer where PowerShell 2.0 has been
installed.
• Verify that your Windows domain account is a member of the
Administrators group on the server that is running Reporting
Services.
NOTE: Your Windows domain account must be directly assigned to the
Administrators group. Belonging to a group that is a member of the
Administrators group is not sufficient.
• Verify that you are assigned to the Reporting Services administrator
role.
Regards,
Hossein Karimi
+10 years of experience with hands-on lead-level background in the full life cycle of software development with demonstrated cross-functional team leadership skills.
Programming:
• ERP :Microsoft Dynamics AX 2012
• Language :X++, C#, C++, XAML, Asp.Net, Html, VB.Net, Android
• Environment : Windows XP, Windows 8, Windows 10, Windows Server
• DataBase : Oracle 9i,10g,11g and SqlServer and SQLlite
Set Up a Report as a Batch
follow these steps:
1. Open Accounts receivable > Reports > Transactions > Sales order > Order lines not invoiced.
2. Click Destinations.
3. In the left pane, select E-mail.
4. In To, select Kevin@contoso.com. (mailto:Kevin@contoso.com.)
5. In Subject, type "Order lines not invoiced report", then click OK.
6. Select the Batch tab.
7. Select Batch Processing.
8. Set the Batch group to the desired batch group.
9. Click Recurrence.
10. In Range of recurrence, select No end date.
11. In Recurring pattern, select Weeks.
12. In Fixed weekly interval, type "1".
13. Select Friday, then click OK.
14. Click OK.
Regards,
Hossein Karimi
+10 years of experience with hands-on lead-level background in the full life cycle of software development with demonstrated cross-functional team leadership skills.
Programming:
• ERP :Microsoft Dynamics AX 2012
• Language :X++, C#, C++, XAML, Asp.Net, Html, VB.Net, Android
• Environment : Windows XP, Windows 8, Windows 10, Windows Server
• DataBase : Oracle 9i,10g,11g and SqlServer and SQLlite
Batch Support
SSRS reports in Microsoft Dynamics AX 2012 can now be integrated with the
Microsoft Dynamics AX batch framework. This enables you to:
• Schedule a long-running report to be printed during off-peak hours.
• Schedule a report to be printed on a recurring-basis.
Many tasks in Microsoft Dynamics AX can be run as part of batch jobs. For
example, batch jobs can include tasks for printing reports, performing
maintenance, or sending electronic documents. By using batch jobs, you can
avoid slowing down your computer or the server during typical working hours.
Most batch tasks can be run on a batch server, but some must be run on the
client. Tasks that run on the server can run automatically as part of batch jobs,
regardless of whether a client is open. However, tasks that run on the client must
be run manually by using the Set up batch processing form. If a client task is
marked Private, only the user who created that task can run it.
The tasks in a batch job can run sequentially or at the same time. In addition, you
can create dependencies between tasks. This means that you can set up a different
sequence of tasks depending on whether an earlier task succeeds or fails.
You can set up recurrence patterns for batch jobs. For example, you can set up a
job to process invoices automatically at the end of every month.
To monitor batch jobs, you can set up alerts. Alerts can be sent when the batch
job succeeds, fails, or finishes.
After a batch job has been processed, you can view history. This includes any
messages encountered when the job is running.
Use batch groups to categorize batch tasks and run them on specific servers. The
servers in your environment may have different software installed or may be
available at different times of day. Batch groups are used to direct batch tasks to
the most appropriate server. Tasks in the same batch job can belong to different
batch groups.
For example, you might have Server A set up to print reports and Server B set up
to send electronic documents. You can use batch groups to make sure that
reporting tasks are run on Server A and electronic documents are processed by
Server B.
Regards,
Hossein Karimi
+10 years of experience with hands-on lead-level background in the full life cycle of software development with demonstrated cross-functional team leadership skills.
Programming:
• ERP :Microsoft Dynamics AX 2012
• Language :X++, C#, C++, XAML, Asp.Net, Html, VB.Net, Android
• Environment : Windows XP, Windows 8, Windows 10, Windows Server
• DataBase : Oracle 9i,10g,11g and SqlServer and SQLlite
Architectural Considerations for Reporting
The complexity of the how you access data, how you prompt the user to print the
report, and the design of the report are all architectural considerations to take into
account.
The following table provides architectural considerations when you plan,
convert, and define your reports.
Regards,
Hossein Karimi
report, and the design of the report are all architectural considerations to take into
account.
The following table provides architectural considerations when you plan,
convert, and define your reports.
| Question | Consideration |
| Is event handling in the input dialog required? | If yes, use a UIBuilder for the report. If no, decorate a report contract. |
| Do you need to pre-process input data? Do you need to manipulate or modify input data? Do you want to be able to open different reports from the same dialog? Do you want to run the report from a form? | If yes, create a custom Controller for the report. If no, use the default Controller. |
| Is the report a simple list of data? | If yes, use auto design to create the layout of the report. If no, use precision design to control the layout of the report. |
Regards,
Hossein Karimi
+10 years of experience with hands-on lead-level background in the full life cycle of software development with demonstrated cross-functional team leadership skills.
Programming:
• ERP :Microsoft Dynamics AX 2012
• Language :X++, C#, C++, XAML, Asp.Net, Html, VB.Net, Android
• Environment : Windows XP, Windows 8, Windows 10, Windows Server
• DataBase : Oracle 9i,10g,11g and SqlServer and SQLlite
Planning Considerations for Reporting
It is recommended that you consider the following information before
implementing the reporting features of Microsoft Dynamics AX.
Topology
Before selecting a topology, consider the following question.Will you implement Reporting Services in a scale-out
deployment or failover cluster?
Reporting Services offers several approaches for deploying server components.
• Scale-out deployment: A report server scale-out deployment is two
or more report server instances that share a single report server
database. A scale-out deployment enables you to increase the
number of users who concurrently access reports and improve the
availability of the report server. For more information, refer to the
SQL Server documentation on TechNet.
• Failover cluster: SQL Server provides failover clustering support so
that you can use multiple disks for one or more SQL Server
instances. Failover clustering is supported only for the report server
database; you cannot run the Reporting Services Windows service as
part of a failover cluster. For more information, refer to the SQL
Server documentation on TechNet.
Security
To help plan for security, consider the following question.
Who should have access to each report?
Determine who should have access to each report. To grant users access to
reports, you will need to do the following:
1. Assign users to roles and tasks in Microsoft Dynamics AX. For more
information, refer to MSDN or TechNet.
2. Set up security in Reporting Services. For more information, see the
SQL Server documentation on TechNet.
Have you assigned users to Analysis Services roles?
Some reports use online analytical processing (OLAP) cubes to access data. In
order for users to view data on such reports, you must assign users to roles in
SQL Server Analysis Services. For more information, Planning considerations
for analytics on TechNet.
Customizations
To help plan any customizations you may need to implement, consider the
following questions.
Will you need to create new, custom reports?
If you or anyone in your organization needs to create a new, custom report, there
are several tools available. For example, you could use the Auto-report Wizard in
Microsoft Dynamics AX to create a list of customers in a specific sales territory.
Or you could use the Data Connection Wizard in Excel to create a PivotChart
report that shows the sum of sales for each salesperson by product in all regions
over all recorded years.
Which license keys and configuration keys do you use?
Functionality in Microsoft Dynamics AX can be turned on or off depending on
license and configuration keys.
• A license key controls the modules that are available to you. For
example, if you have the Additional Modules license, you can use
the Human Resources I and Human Resources II modules. License
keys must be purchased.
• A configuration key controls the functionality that is available to you
within a module. For example, if you have the Recruiting
(HRMMangementRecruting) configuration key, you can use the
recruiting forms and functionality in the Human Resources II
module.
Some reports use online analytical processing (OLAP) cubes to access data. The
default OLAP cubes that are provided with Microsoft Dynamics AX require full
license and configuration keys. When you turn off license or configuration keys,
data is removed from corresponding columns in the online transaction processing
(OLTP) database. As a result, cubes cannot access the data they were designed to
retrieve. This means that you may see errors displayed in reports and Role Center
web parts that use cubes as a data source. You will need to modify these reports
and web parts so that they no longer try to retrieve data from a column or field
that contains no data.
Regards,
Hossein Karimi
+10 years of experience with hands-on lead-level background in the full life cycle of software development with demonstrated cross-functional team leadership skills.
Programming:
• ERP :Microsoft Dynamics AX 2012
• Language :X++, C#, C++, XAML, Asp.Net, Html, VB.Net, Android
• Environment : Windows XP, Windows 8, Windows 10, Windows Server
• DataBase : Oracle 9i,10g,11g and SqlServer and SQLlite
Reporting Architecture
The following diagram illustrates the architecture of the reporting functionality in
Microsoft Dynamics AX.
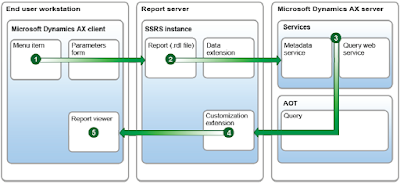
To better understand how a report is rendered, review the following steps.
1. A user requests a report.
Assume that a user clicks a menu item in the Microsoft Dynamics AX
client. The menu item is bound to a SQL Server Reporting Services
report.
After the user clicks the menu item, a parameters form is displayed to the
user. The user enters parameters to filter the data that will be displayed
on the report.
The Microsoft Dynamics AX client then requests the report from
Reporting Services. (The request includes the parameters entered by the user.)
2. Reporting Services receives the request and asks the Microsoft
Dynamics AX server for the report data.
Reporting Services receives the request and examines the report on the
server. The report is stored as an .rdl file. The .rdl file indicates the
report’s data source. (The data source could be a Microsoft Dynamics
AX query, a report data provider class, or an external data source via
report data methods.)
In cases where a Microsoft Dynamics AX data source is used for the
report, Reporting Services will use the Microsoft Dynamics AX data
extension to retrieve the data.
At this point, Reporting Services asks Microsoft Dynamics AX for
metadata about the data source. Reporting Services then requests the data
for the report.
3. The Microsoft Dynamics AX server receives the request and sends
the report data back to Reporting Services.
The Microsoft Dynamics AX services examine the query in the AOT to
return the requested metadata. The services also execute the query to
generate the data for the report.
Microsoft Dynamics AX returns the metadata and data to Reporting Services.
NOTE: Microsoft Dynamics AX enforces security on all data returned. If the
user who is running the report is not allowed to see a specific field, the data for
that field is not returned.
4. Reporting Services renders the report and sends it to the
Microsoft Dynamics AX client.
The Microsoft Dynamics AX customization extension formats the report.
The customization extension uses metadata to provide automatic
formatting of data and can affect the positioning and layout of elements
in the report.
Reporting Services then renders the report into a visual representation
and sends that to the Microsoft Dynamics AX client.
5. The report is displayed to the user.
The Microsoft Dynamics AX client displays the report to the user in the
report viewer control.
Regards,
Hossein Karimi
+10 years of experience with hands-on lead-level background in the full life cycle of software development with demonstrated cross-functional team leadership skills.
Programming:
• ERP :Microsoft Dynamics AX 2012
• Language :X++, C#, C++, XAML, Asp.Net, Html, VB.Net, Android
• Environment : Windows XP, Windows 8, Windows 10, Windows Server
• DataBase : Oracle 9i,10g,11g and SqlServer and SQLlite
Restrict a Database Role to Specific Members of a Dimension
Complete the following procedure to restrict a database role to specific members
of a dimension.
For example, the cubes that are included with Microsoft Dynamics AX have a
Company dimension. By default, each role has access to data in all company
accounts. You can restrict a role to specific company accounts in the Company
dimension.
1. In SQL Server Management Studio, connect to your Analysis
Services instance.
2. In the tree view, expand the Databases > [Database Name] > Roles node.
3. Right-click the appropriate role and click Properties. The Edit Role
– [Role Name] form is displayed.
4. In the Select a page area, click Dimension Data. From theDimension list, select a dimension. For example, to restrict the role
to specific company accounts, select the Company dimension.
5. On the Basic tab, select the same dimension from the list. Then
select the members of the dimension that the role should have access to.
6. For example, if you selected the Company dimension, you would
now select the specific company accounts (or dimension members)
the role should have access to.
7. Click OK.
Regards,
Hossein Karimi
+10 years of experience with hands-on lead-level background in the full life cycle of software development with demonstrated cross-functional team leadership skills.
Programming:
• ERP :Microsoft Dynamics AX 2012
• Language :X++, C#, C++, XAML, Asp.Net, Html, VB.Net, Android
• Environment : Windows XP, Windows 8, Windows 10, Windows Server
• DataBase : Oracle 9i,10g,11g and SqlServer and SQLlite
Specify which Cubes a Database Role has Access to
Complete the following procedure to specify which cubes a specific role has
access to.
1. In SQL Server Management Studio, connect to your Analysis Services instance.
2. In the tree view, expand the Databases ><OLAP Database Name> > Roles node.
3. Right-click the role for which you want to restrict access. ClickProperties. The Edit Role - <Role Name> form is displayed.
4. In the Select a page pane, click Cubes. A list of the default cubes is
displayed.
5. In the Access column, specify the type of access the selected role
should have for each cube. You can select None, Read, or Read/Write.
6. Click OK.
Regards,
Hossein Karimi
+10 years of experience with hands-on lead-level background in the full life cycle of software development with demonstrated cross-functional team leadership skills.
Programming:
• ERP :Microsoft Dynamics AX 2012
• Language :X++, C#, C++, XAML, Asp.Net, Html, VB.Net, Android
• Environment : Windows XP, Windows 8, Windows 10, Windows Server
• DataBase : Oracle 9i,10g,11g and SqlServer and SQLlite
Assign Users to a Database Role
Complete the following procedure to assign users to a default database role.
1. In SQL Server Management Studio, connect to your Analysis
Services instance.
2. In the tree view, expand the Databases ><OLAP Database Name> > Roles node.
3. Right-click the role you want to add users to. Click Properties. TheEdit Role - <Role Name> form is displayed.
4. In the Select a page pane, click Membership.

5. Click Add to add appropriate users to this role
Regards,
Hossein Karimi
+10 years of experience with hands-on lead-level background in the full life cycle of software development with demonstrated cross-functional team leadership skills.
Programming:
• ERP :Microsoft Dynamics AX 2012
• Language :X++, C#, C++, XAML, Asp.Net, Html, VB.Net, Android
• Environment : Windows XP, Windows 8, Windows 10, Windows Server
• DataBase : Oracle 9i,10g,11g and SqlServer and SQLlite
Automate Processing of Cubes
Processing is the act of refreshing the data in a cube. During processing, data in a
cube is refreshed with data from the online transaction processing (OLTP)
database.
SQL Server Analysis Services provides several configuration options that enable
you to maximize performance, minimize latency, and schedule processing of
cubes. For more information about processing options in Analysis Services, see
the SQL Server documentation on MSDN (http://technet.microsoft.com/enus/library/bb500256.aspx) .
Regards,
Hossein Karimi
+10 years of experience with hands-on lead-level background in the full life cycle of software development with demonstrated cross-functional team leadership skills.
Programming:
• ERP :Microsoft Dynamics AX 2012
• Language :X++, C#, C++, XAML, Asp.Net, Html, VB.Net, Android
• Environment : Windows XP, Windows 8, Windows 10, Windows Server
• DataBase : Oracle 9i,10g,11g and SqlServer and SQLlite
Connect Analysis Services to the AOS
To integrate Microsoft Dynamics AX and Analysis Services, you must connect
Analysis Services to the Application Object Server (AOS). To do so, use your
Microsoft Dynamics AX client to complete the following procedure.
1. Open the Business intelligence analysis servers form (System
administration > Setup > Business analysis > OLAP > Business
intelligence analysis servers).
2. Click the OLAP servers tab.
3. Enter the name and a description of the server that is running
Analysis Services.
4. Select the check box for the server to indicate that this is the default
OLAP server.
5. Click the OLAP databases tab.
6. Enter the name and a description of your OLAP database. By default,
the OLAP database that stores the Microsoft Dynamics AX cubes is
named Dynamics AX.
7. Select the check box for the database to indicate that this is the
default OLAP database.
8. Click the Advanced tab.
9. Select the Update BI data check box.
10. Click the Update databases button.
11. Close the form to save your changes.
Regards,
Hossein Karimi
+10 years of experience with hands-on lead-level background in the full life cycle of software development with demonstrated cross-functional team leadership skills.
Programming:
• ERP :Microsoft Dynamics AX 2012
• Language :X++, C#, C++, XAML, Asp.Net, Html, VB.Net, Android
• Environment : Windows XP, Windows 8, Windows 10, Windows Server
• DataBase : Oracle 9i,10g,11g and SqlServer and SQLlite
Configure Default Cubes
To configure the default cubes, follow these steps:
1. Open File > Tools > Business Intelligence (BI) tools > SQL Server
Analysis Services project wizard.
2. Click Next.
3. Select Configure, and then click Next.
4. Select Select a project from the AOT.
5. In the drop-down menu, select "Dynamics AX", and then click Next.
6. Wait while the wizard verifies the SQL Server Analysis Services
project, and then click Next.
7. Select Apply the Microsoft Dynamics AX configuration to the
project Analysis Services project, and then click Next.
8. Select "English (United States)", and then click Next.
9. Wait while the wizard generates the SQL Server Analysis Services
project, and then click Next.
10. Select the Deploy the project check box.
11. In the Server name field, type "NYC-DC1".
12. In Database name field, type "Dynamics AX".
13. Select the Process the project after it is successfully deployed check box, then click Next.
Regards,
Hossein Karimi
+10 years of experience with hands-on lead-level background in the full life cycle of software development with demonstrated cross-functional team leadership skills.
Programming:
• ERP :Microsoft Dynamics AX 2012
• Language :X++, C#, C++, XAML, Asp.Net, Html, VB.Net, Android
• Environment : Windows XP, Windows 8, Windows 10, Windows Server
• DataBase : Oracle 9i,10g,11g and SqlServer and SQLlite
Configuration and Fixed Schema
The default cubes that are provided with Microsoft Dynamics AX were created
with full license and configuration keys. You can use the Configuration form to
modify the overall configuration of the system. When you disable a configuration
key, the features that are linked to the configuration key will be disabled and
hidden from the users. Likewise when you load a license file that does not have a
specific module or feature, the features linked to the license code are disabled
and hidden.
Fixed Schema
In Microsoft Dynamics AX 2009, when you turned off license or configuration
keys, associated columns were removed from tables in the OLTP database. As a
result:
• Cubes could not be processed (because they could not access the
columns they were designed to retrieve data from).
• Errors were displayed in reports and Role Center web parts that used
cubes as a data source.
In Microsoft Dynamics AX 2012, the OLTP database has a fixed schema. This
means that when you turn off license or configuration keys, associated columns
are not removed from tables in the OLTP database. Instead, data is removed from
those columns. As a result:
• Cubes can be processed successfully.
• You may see errors displayed in reports and Role Center web parts
that use cubes as a data source. You will need to modify these
reports and web parts so that they no longer try to retrieve data from
a column or field that contains no data.
When you have finalized configuration keys or loaded a license file, you must
perform a final configuration of the cubes. The final configuration will remove
unnecessary content that is not relevant given configuration keys from the cubes,
but not the Microsoft Dynamics AX OLAP database. The two options for
configuring cubes include the following:
• SQL Server Analysis Services Project Wizard.
o No Business Intelligence (BI) skills are required for this option.
o The Wizard will perform a satisfactory configuration of the
cubes, but will be aggressive in removing irrelevant information.
• Manual configuration.
o Manual configuration of cubes is no longer needed, but it
provides the systems implementer more control on what to
remove.
A later change in the configuration or license file will require that you configure
the cubes again.
Regards,
Hossein Karimi
+10 years of experience with hands-on lead-level background in the full life cycle of software development with demonstrated cross-functional team leadership skills.
Programming:
• ERP :Microsoft Dynamics AX 2012
• Language :X++, C#, C++, XAML, Asp.Net, Html, VB.Net, Android
• Environment : Windows XP, Windows 8, Windows 10, Windows Server
• DataBase : Oracle 9i,10g,11g and SqlServer and SQLlite
Update Cubes
You can incrementally update the objects for an existing SQL Server Analysis
Services project based on metadata defined in Microsoft Dynamics AX. This
topic describes how to use the SQL Server Analysis Services project wizard to
update Analysis Services projects.
You can update an Analysis Services project without overwriting the core
dimensional model object definitions, such as dimensions, dimension attributes,
measure groups, measures, and cubes. For example, you can update an Analysis
Services project to add new language translations for tables and fields that are
referenced by a deployed cube.
You can also add new attributes and measures to a perspective and then update a
deployed cube by using the Analysis Services project wizard.
You can create Key Performance Indicators (KPIs) in SQL Server Business
Intelligence Development Studio (BIDS) after you create an Analysis Services
project. KPIs are also included with the default cubes. When you configure or
update the Analysis Services project, the KPIs will be updated based on the
following:
• If the KPI is in both the source and the target Analysis Services
projects, the KPI from the source will override the KPI from the
target.
• If the KPI is in the source only, the KPI from the source will be
added to the updated Analysis Services project.
• If the KPI is in the target only, the KPI from the target will remain
unchanged in the Analysis Services project. In this case, the KPI may
become invalid if it uses data that has been removed from the
Analysis Services project. You must validate your KPIs in this
scenario.
NOTE: For more information about creating and modifying perspectives, refer
to the help. For more information about BIDS, refer to MSDN or TechNet.
When you update an Analysis Services project by using the wizard, the old
project is overwritten by a new Analysis Services project. A backup copy of the
project folder is available in your temp directory. For example, the project folder
may be located in C:\Users\User1\AppData\Local\Temp\1.
To update a SQL Server Analysis Services project, follow these steps:
1. Click File > Tools > Business Intelligence (BI) tools > SQL Server
Analysis Services project wizard. The SQL Server Analysis
Services Project wizard form is displayed. Click Next.
2. Select Update. Click Next.
3. Select the Analysis Services project to update. You can select a
project that is already deployed in the AOT or open a project from a
file. Click Next. If the project builds, click Next again.
4. Select the perspectives that correspond with the cubes you want
included in the project. Move the perspectives you want to include in
the project to the Selected list. Move the perspectives you want to
remove from the project to the Available list. Click Next.
5. On the Select Microsoft Dynamics AX dimensions page, select
Microsoft Dynamics AX dimensions to associate with the cubes and
then click Next.
NOTE: Dimensions in the Selected list will be included in the project.
Dimensions in the Available list will not be added to the project, and will be
removed if they were in the project before.
6. Select calendars to use for date dimensions and then click Next.
NOTE: Calendars in the Selected list will be included in the project. Calendars
in the Available list will not be added to the project, and will be removed if they
were in the project before.
7. Select label languages that you want to include as translations and
then click Next.
NOTE: Languages in the Selected list will be included in the project. Languages
in the Available list will not be added to the project, and will be removed if they
were in the project before.
8. Select to add foreign currency support to the Analysis Servicesproject. Click Next.
9. Specify deployment options. Click Next and complete the wizard.
Regards,
Hossein Karimi
+10 years of experience with hands-on lead-level background in the full life cycle of software development with demonstrated cross-functional team leadership skills.
Programming:
• ERP :Microsoft Dynamics AX 2012
• Language :X++, C#, C++, XAML, Asp.Net, Html, VB.Net, Android
• Environment : Windows XP, Windows 8, Windows 10, Windows Server
• DataBase : Oracle 9i,10g,11g and SqlServer and SQLlite
Deploy Default Cubes
Microsoft Dynamics AX provides default cubes that you can use. Complete the
following procedure to deploy these cubes.
1. Open your Microsoft Dynamics AX client.
2. Start the SQL Server Analysis Services project wizard (File > Tools > Business Intelligence (BI) tools > SQL Server Analysis Services project wizard).
3. On the Welcome to Analysis Project Wizard page, click Next.
4. On the Select an option page, click Deploy, and then click Next.
5. On the Select an existing SQL Server Analysis Services projectpage, click Select a project from the AOT. Select the Dynamics
AX project. Click Next.
6. On the Deployment options page, select Deploy the project. Then
do the following:
a. Enter the name of the server running Analysis Services.
b. Select Create a new database.
c. Enter a name for the new Analysis Services database that will be
created.
d. Click Process the project after it is successfully deployed.
e. Click Next.
7. On the Deploying page, click Next.
8. When the deployment is complete, click Finish to close the wizard.
Regards,
Hossein Karimi
following procedure to deploy these cubes.
1. Open your Microsoft Dynamics AX client.
2. Start the SQL Server Analysis Services project wizard (File > Tools > Business Intelligence (BI) tools > SQL Server Analysis Services project wizard).
3. On the Welcome to Analysis Project Wizard page, click Next.
4. On the Select an option page, click Deploy, and then click Next.

5. On the Select an existing SQL Server Analysis Services projectpage, click Select a project from the AOT. Select the Dynamics
AX project. Click Next.
6. On the Deployment options page, select Deploy the project. Then
do the following:
a. Enter the name of the server running Analysis Services.
b. Select Create a new database.
c. Enter a name for the new Analysis Services database that will be
created.
d. Click Process the project after it is successfully deployed.
e. Click Next.
7. On the Deploying page, click Next.
8. When the deployment is complete, click Finish to close the wizard.
Regards,
Hossein Karimi
+10 years of experience with hands-on lead-level background in the full life cycle of software development with demonstrated cross-functional team leadership skills.
Programming:
• ERP :Microsoft Dynamics AX 2012
• Language :X++, C#, C++, XAML, Asp.Net, Html, VB.Net, Android
• Environment : Windows XP, Windows 8, Windows 10, Windows Server
• DataBase : Oracle 9i,10g,11g and SqlServer and SQLlite
Subscribe to:
Posts (Atom)
-
 The below select query will give the both the Sales Line record count and the sum of sales quantity. static void Test_Data(Args _args) ...
 -
In Reporting Services, reports and resources are processed under the security identity of the user who is running the report. If the report ...
-
A List object contains members that are accessed sequentially. Lists are structures that can contain members of any X++ type. All the member...