Because the new role center is going to be fundamentally similar to the Accounting Manager role center, this procedure will skip the steps that are involved in adding the same web parts to the new role center that are on the existing webpage. Once that has been completed, the last step is to add the new component to the CAO role center.
1. In Microsoft Dynamics AX, navigate to System Administration >Common > Users > User Profiles.
2. Select the CAO profile and click View role center.
3. Click the Site Actions button, and choose Edit Page. The webpage
will load in Edit mode.
4. Navigate to the Middle Column section.
5. Click on the Add a Web Part button.
6. The Add Web Parts to Middle Column dialog will open. Select the Microsoft Dynamics AX category, Report web part and click Add.
7. The new Microsoft Dynamics AX web part displays in the Middle Column, in its default view. Select the check box in the web part,click the drop-down arrow and select Edit Web Part. The page will reload with the Properties window on the right.
8. In the Properties window, select the report using the Output menu item name, CustomerOpenTransactions.
9. Enter parameters for the From and To dates.
10. Click OK. The role center should reload with the report displayed.
Regards,
Hossein Karimi

AX,365,NAV(tutorials: tips and tricks)
Showing posts with label Enterprise Portal and Role Centers. Show all posts
Showing posts with label Enterprise Portal and Role Centers. Show all posts
Friday, July 20, 2018
Add Report to Role Center

 +10 years of experience with hands-on lead-level background in the full life cycle of software development with demonstrated cross-functional team leadership skills.
Programming:
• ERP :Microsoft Dynamics AX 2012
• Language :X++, C#, C++, XAML, Asp.Net, Html, VB.Net, Android
• Environment : Windows XP, Windows 8, Windows 10, Windows Server
• DataBase : Oracle 9i,10g,11g and SqlServer and SQLlite
+10 years of experience with hands-on lead-level background in the full life cycle of software development with demonstrated cross-functional team leadership skills.
Programming:
• ERP :Microsoft Dynamics AX 2012
• Language :X++, C#, C++, XAML, Asp.Net, Html, VB.Net, Android
• Environment : Windows XP, Windows 8, Windows 10, Windows Server
• DataBase : Oracle 9i,10g,11g and SqlServer and SQLlite
Create Role Center
Follow these steps to create the new Role Center:
1. In Microsoft Dynamics AX, navigate to System Administration >Setup > Enterprise Portal > Website. Click the Enterprise Portal record and click View in browser. The Enterprise Portal will open in a browser.
2. On the Site Actions menu, click More Options. A dialog box that contains a list of the items that you can create is displayed.
3. Click Page and All Categories under Filter by:.
4. Click Web Part Page, and then click Create.
5. Name the new page EPCAORoleCenter.
6. Choose Header, Footer, 3 Columns as the Layout Template.
7. Select Enterprise Portal for the Document library.
8. Click Create to create the new page. The new webpage will load.Click No to disable Autocomplete.
9. Create a URL object in Microsoft Dynamics AX 2012 to reference this new web page. In the Microsoft Dynamics AX 2012 AOT,navigate to Web > Web Menu Items > URLs. Right-click the URLs node and select New URL.
10. Open the Properties window for the new URL and set its Name to EPCAORoleCenter.
11. In the HelpText type CAO Role Center.
12. In the URL type Enterprise%20Portal/EPCAORoleCenter.aspx.
13. Set ConfigurationKey to LedgerBasic.
14. Set HomePage to Yes.
15. Save the URL.
16. Make a new user profile to relate to this Role Center. Navigate to System Administration > Common > Users > User profiles.Create a new record.
17. Set Profile ID to CAO.
18. Set Description to Chief Accounting Officer.
19. Set Role Center to EPCAORoleCenter.
20. Assign users to this profile with the Add User button. For the purposes of this lab, assign your own user. Click on File > Tools >Options to see your current user ID.
Regards,
Hossein Karimi
1. In Microsoft Dynamics AX, navigate to System Administration >Setup > Enterprise Portal > Website. Click the Enterprise Portal record and click View in browser. The Enterprise Portal will open in a browser.
2. On the Site Actions menu, click More Options. A dialog box that contains a list of the items that you can create is displayed.
3. Click Page and All Categories under Filter by:.
4. Click Web Part Page, and then click Create.
5. Name the new page EPCAORoleCenter.
6. Choose Header, Footer, 3 Columns as the Layout Template.
7. Select Enterprise Portal for the Document library.
8. Click Create to create the new page. The new webpage will load.Click No to disable Autocomplete.
9. Create a URL object in Microsoft Dynamics AX 2012 to reference this new web page. In the Microsoft Dynamics AX 2012 AOT,navigate to Web > Web Menu Items > URLs. Right-click the URLs node and select New URL.
10. Open the Properties window for the new URL and set its Name to EPCAORoleCenter.
11. In the HelpText type CAO Role Center.
12. In the URL type Enterprise%20Portal/EPCAORoleCenter.aspx.
13. Set ConfigurationKey to LedgerBasic.
14. Set HomePage to Yes.
15. Save the URL.
16. Make a new user profile to relate to this Role Center. Navigate to System Administration > Common > Users > User profiles.Create a new record.
17. Set Profile ID to CAO.
18. Set Description to Chief Accounting Officer.
19. Set Role Center to EPCAORoleCenter.
20. Assign users to this profile with the Add User button. For the purposes of this lab, assign your own user. Click on File > Tools >Options to see your current user ID.
Regards,
Hossein Karimi
+10 years of experience with hands-on lead-level background in the full life cycle of software development with demonstrated cross-functional team leadership skills.
Programming:
• ERP :Microsoft Dynamics AX 2012
• Language :X++, C#, C++, XAML, Asp.Net, Html, VB.Net, Android
• Environment : Windows XP, Windows 8, Windows 10, Windows Server
• DataBase : Oracle 9i,10g,11g and SqlServer and SQLlite
Apply Layout and Style Templates
Follow these steps to apply layout and style templates to the report:
1. In Model Editor, right-click the Filters node, and then click Add Filter.
2. Select the node for the filter.
3. In the Properties window, specify the following values.
o Expression: =Fields!TransDate.Value
o Name: ToDateFilter
o Operator: LessThanOrEquals
o Value: =Parameters!ToDate.Value
4. In Model Editor, select the AutoDesign1 node.
5. In the Properties window, set the LayoutTemplate property to ReportLayoutStyleTemplate. Also, type Customer transactions for the Title property.
6. In Model Editor, expand the AutoDesign1 node, and then select the node for the chart data region.
7. In the Properties window, set the Style Template property to ColumnChartStyleTemplate.
8. Delete the default text for the Title property so that it does not display a title for the data region.
9. Set the Value Axis Data Scale Minimum property to 5. This will set the starting value on the axis of your report to 5 instead of 0. This is one of many properties that will define the look of your report.
10. Click the Save All icon on the menu toolbar to save the report.
11. In Solution Explorer, right-click the SampleChartReport project and click Build.
12. In Solution Explorer, right-click the SampleChartReport project and click Deploy.
13. In Solution Explorer, right-click the SampleChartReport project and click Add SampleChartReport to AOT.
Regards,
Hossein Karimi
1. In Model Editor, right-click the Filters node, and then click Add Filter.
2. Select the node for the filter.
3. In the Properties window, specify the following values.
o Expression: =Fields!TransDate.Value
o Name: ToDateFilter
o Operator: LessThanOrEquals
o Value: =Parameters!ToDate.Value
4. In Model Editor, select the AutoDesign1 node.
5. In the Properties window, set the LayoutTemplate property to ReportLayoutStyleTemplate. Also, type Customer transactions for the Title property.
6. In Model Editor, expand the AutoDesign1 node, and then select the node for the chart data region.
7. In the Properties window, set the Style Template property to ColumnChartStyleTemplate.
8. Delete the default text for the Title property so that it does not display a title for the data region.
9. Set the Value Axis Data Scale Minimum property to 5. This will set the starting value on the axis of your report to 5 instead of 0. This is one of many properties that will define the look of your report.
10. Click the Save All icon on the menu toolbar to save the report.
11. In Solution Explorer, right-click the SampleChartReport project and click Build.
12. In Solution Explorer, right-click the SampleChartReport project and click Deploy.
13. In Solution Explorer, right-click the SampleChartReport project and click Add SampleChartReport to AOT.
Regards,
Hossein Karimi
+10 years of experience with hands-on lead-level background in the full life cycle of software development with demonstrated cross-functional team leadership skills.
Programming:
• ERP :Microsoft Dynamics AX 2012
• Language :X++, C#, C++, XAML, Asp.Net, Html, VB.Net, Android
• Environment : Windows XP, Windows 8, Windows 10, Windows Server
• DataBase : Oracle 9i,10g,11g and SqlServer and SQLlite
Configure Report Parameters
Follow these steps to configure the report parameters:
1. In Model Editor, expand the node for the TransDate series, expand the GroupOn node, and then select the TransDate node that is located below the GroupOn node.
2. In the Properties window, type =Year(Fields!TransDate.Value) for the Expression property.
3. In Model Editor, expand the Parameters node, and then select the CustomerTransactions_TransType parameter.
4. In the Properties window, set the following property values:
o Allow Blank: False
o Data Type: Integer
o Default Value: 2
o Visibility: Hidden
5. For the Values field, click the ellipsis button (...) to open the Select Values dialog box. Click From dataset and then set the following values:
o Dataset: LedgerTransTypeEnum
o Value field: Value
o Label field: Label
6. Click OK to close the Select Values dialog box.
7. In Model Editor, right-click the Parameters node and then click Add > Parameter.
8. Select the node for the parameter.
9. In the Properties window, specify the following values.
o Data Type: DateTime
o Name: FromDate
o Prompt String: From date:
10. In Model Editor, right-click the Parameters node and then click Add Parameter.
11. Select the node for the parameter.
12. In the Properties window, specify the following values.
o Data Type: DateTime
o Name: ToDate
o Prompt String: To date:
13. In Model Editor, expand the Designs node, expand the AutoDesign1 node, and then expand the node for the chart data region.
14. Right-click the Filters node, and then click Add Filter.
15. Select the node for the filter.
16. In the Properties window, specify the following values.
o Name: FromDateFilter
o Operator: GreaterThanOrEquals
o Value: =Parameters!FromDate.Value
Regards,
Hossein Karimi
1. In Model Editor, expand the node for the TransDate series, expand the GroupOn node, and then select the TransDate node that is located below the GroupOn node.
2. In the Properties window, type =Year(Fields!TransDate.Value) for the Expression property.
3. In Model Editor, expand the Parameters node, and then select the CustomerTransactions_TransType parameter.
4. In the Properties window, set the following property values:
o Allow Blank: False
o Data Type: Integer
o Default Value: 2
o Visibility: Hidden
5. For the Values field, click the ellipsis button (...) to open the Select Values dialog box. Click From dataset and then set the following values:
o Dataset: LedgerTransTypeEnum
o Value field: Value
o Label field: Label
6. Click OK to close the Select Values dialog box.
7. In Model Editor, right-click the Parameters node and then click Add > Parameter.
8. Select the node for the parameter.
9. In the Properties window, specify the following values.
o Data Type: DateTime
o Name: FromDate
o Prompt String: From date:
10. In Model Editor, right-click the Parameters node and then click Add Parameter.
11. Select the node for the parameter.
12. In the Properties window, specify the following values.
o Data Type: DateTime
o Name: ToDate
o Prompt String: To date:
13. In Model Editor, expand the Designs node, expand the AutoDesign1 node, and then expand the node for the chart data region.
14. Right-click the Filters node, and then click Add Filter.
15. Select the node for the filter.
16. In the Properties window, specify the following values.
o Expression: =Fields!TransDate.Value
o Name: FromDateFilter
o Operator: GreaterThanOrEquals
o Value: =Parameters!FromDate.Value
Regards,
Hossein Karimi
+10 years of experience with hands-on lead-level background in the full life cycle of software development with demonstrated cross-functional team leadership skills.
Programming:
• ERP :Microsoft Dynamics AX 2012
• Language :X++, C#, C++, XAML, Asp.Net, Html, VB.Net, Android
• Environment : Windows XP, Windows 8, Windows 10, Windows Server
• DataBase : Oracle 9i,10g,11g and SqlServer and SQLlite
Create a Report
Follow these steps to create a new report:
1. In Solution Explorer, right-click the SampleChartReport project,
point to Add, and then click Report.
2. In Model Editor, right-click the Report1 node, and then click Rename.
3. Type ColumnChartReport as the name.
4. Expand the ColumnChartReport node if it is not already expanded.
5. Right-click the Datasets node, and then click Add Dataset.
6. Select the node for the dataset.
7. In the Properties window, specify the following values.
o Data Source: Dynamics AX
o Data Source Type: Query
o Default Layout: ColumnChart
o Dynamic Filters: False
o Name: CustomerTransactions
8. For the Query field, click the ellipsis button (…). A dialog box displays where you can select a query that is defined in the AOT and identify the fields that you want to use. Select the CustTransactionData query. Click Next and then expand the CustTrans_1 > All Fields node. Select the TransDate and AmountMST fields. Expand the CustGroup > All Fields node and
select the Name field. Click OK.
9. In Model Editor, expand the node for the CustomerTransactions dataset and expand the Fields node.
10. Select the AmountMST field, and in the Properties window, set the Aggregate Function property to Sum and the Format String property to Currency.
11. Right-click the Datasets node, and then click Add Dataset. You will create a dataset with an AX Enum Provider data source for the TransType enum field. This will allow you to filter the report to
show specific transaction types.
12. Select the node for the dataset.
13. In the Properties window, specify the following values.
o Data Source: Dynamics AX
o Data Source Type: AX Enum Provider
o Default Layout: Table
o Dynamic Filters: False
o Name: LedgerTransTypeEnum
o Query: LedgerTransType
14. Drag the CustomerTransactions node onto the Designs node for the report. An auto design called AutoDesign1 is created for the report.
17. Drag the TransDate field to the Series node.
18. Select the node for the TransDate series.
19. In the Properties window, type =Year(Fields!TransDate.Value) for the Label property .
Regards,
Hossein Karimi
1. In Solution Explorer, right-click the SampleChartReport project,
point to Add, and then click Report.
2. In Model Editor, right-click the Report1 node, and then click Rename.
3. Type ColumnChartReport as the name.
4. Expand the ColumnChartReport node if it is not already expanded.
5. Right-click the Datasets node, and then click Add Dataset.
6. Select the node for the dataset.
7. In the Properties window, specify the following values.
o Data Source: Dynamics AX
o Data Source Type: Query
o Default Layout: ColumnChart
o Dynamic Filters: False
o Name: CustomerTransactions
8. For the Query field, click the ellipsis button (…). A dialog box displays where you can select a query that is defined in the AOT and identify the fields that you want to use. Select the CustTransactionData query. Click Next and then expand the CustTrans_1 > All Fields node. Select the TransDate and AmountMST fields. Expand the CustGroup > All Fields node and
select the Name field. Click OK.
9. In Model Editor, expand the node for the CustomerTransactions dataset and expand the Fields node.
10. Select the AmountMST field, and in the Properties window, set the Aggregate Function property to Sum and the Format String property to Currency.
11. Right-click the Datasets node, and then click Add Dataset. You will create a dataset with an AX Enum Provider data source for the TransType enum field. This will allow you to filter the report to
show specific transaction types.
12. Select the node for the dataset.
13. In the Properties window, specify the following values.
o Data Source: Dynamics AX
o Data Source Type: AX Enum Provider
o Default Layout: Table
o Dynamic Filters: False
o Name: LedgerTransTypeEnum
o Query: LedgerTransType
14. Drag the CustomerTransactions node onto the Designs node for the report. An auto design called AutoDesign1 is created for the report.
15. Expand the AutoDesign1 node, expand the node for the chart data region, and then expand the Data node.
16. Drag the Name field to the Categories node.
17. Drag the TransDate field to the Series node.
18. Select the node for the TransDate series.
19. In the Properties window, type =Year(Fields!TransDate.Value) for the Label property .
Regards,
Hossein Karimi
+10 years of experience with hands-on lead-level background in the full life cycle of software development with demonstrated cross-functional team leadership skills.
Programming:
• ERP :Microsoft Dynamics AX 2012
• Language :X++, C#, C++, XAML, Asp.Net, Html, VB.Net, Android
• Environment : Windows XP, Windows 8, Windows 10, Windows Server
• DataBase : Oracle 9i,10g,11g and SqlServer and SQLlite
Create a Reporting Project
Follow these steps to create a Reporting Project in Visual Studio:
1. Open Microsoft Visual Studio.
2. If Visual Studio is run for the first time, select General
Development Settings for the default environment setting and clickStart Visual Studio.
3. On the File menu, point to New, and then click Project. The New
Project dialog box displays.
4. In the Installed Templates pane, click Microsoft Dynamics AXnode, and in the Templates pane, click Report Model.
5. In the Name box, type SampleChartReport, and in the Location box,
type a location.
6. Click OK.
Regards,
Hossein Karimi
1. Open Microsoft Visual Studio.
2. If Visual Studio is run for the first time, select General
Development Settings for the default environment setting and clickStart Visual Studio.
3. On the File menu, point to New, and then click Project. The New
Project dialog box displays.
4. In the Installed Templates pane, click Microsoft Dynamics AXnode, and in the Templates pane, click Report Model.
5. In the Name box, type SampleChartReport, and in the Location box,
type a location.
6. Click OK.
Regards,
Hossein Karimi
+10 years of experience with hands-on lead-level background in the full life cycle of software development with demonstrated cross-functional team leadership skills.
Programming:
• ERP :Microsoft Dynamics AX 2012
• Language :X++, C#, C++, XAML, Asp.Net, Html, VB.Net, Android
• Environment : Windows XP, Windows 8, Windows 10, Windows Server
• DataBase : Oracle 9i,10g,11g and SqlServer and SQLlite
Troubleshooting Enterprise Portal and Role Centers
Many Role Center installation issues can be resolved using these general
troubleshooting guidelines:
1. Check the Windows event log in the Enterprise Portal server to see
whether there are issues within a specific page.
2. If there is a report error, check the error log in the SQL Server
Reporting Services server for additional issues.
Access Issues
If users are having trouble accessing the Enterprise Portal or role centers, check
that the necessary SharePoint security is in place. Security for role centers relies
on Microsoft Dynamics AX 2012, Windows, and SharePoint security settings.
SSRS Report Changes not Visible in the Role Center
If you modify a report in Visual Studio, but the changes are not immediately
visible in the role center or Enterprise Portal, do the following:
1. In Microsoft Dynamics AX 2012, find the SSRS report in the AOT.
Right-click it and select Deploy.
2. When the deployment function runs, be sure to only select the Report
Library that you want to deploy.
3. The report(s) in the Library will be deployed to the Report Manager
and should be updated in the role center or Enterprise Portal when
the deployment is complete.
4. Start a fresh browser or Microsoft Dynamics AX 2012 session to
ensure that old reports are not being pulled from cache.
New Role Centers are Different from Other Role Centers
If you create a new role center, but it does not look similar to the existing role
centers, check that the following was performed:
• The Web Part Page was selected when you created the new
SharePoint webpage
• You selected Header, Footer, 3 Columns as the Layout Template
• You selected Enterprise Portal as the Document Library
New Role Center is Unavailable in the User Profiles Form
If you create a new role center, but it does appear in the role centers dropdown on
the User Profiles form, check the following:
• A new URL Web Menu Item has been created for the ASPX page.
• The URL's Home Page property is set to Yes.
Added Web Parts are not Visible to Other Users
If you insert additional web parts on a role center, but other users in the same role
do not see the changes, check the following:
• Web parts were added to the Shared Version of the web page, and
not the Personal Version.
• If the editing was done within the Content Pane in Microsoft
Dynamics AX 2012, it is possible that the Personal Version was
edited, which will not be seen by other users.
SSAS Components are Unavailable When Editing the Role Center
If you create or modify components in SSAS (for example, if you add a new KPI
to a cube), but the component is not available when you edit the role center (for
example, when trying to add the KPI to a Business Overview web part), check
the following:
• The changed object and all dependent objects, in the BI project are
deployed and processed.
• The BI project must be deployed to the correct OLAP database (in other words, the OLAP database that the Role Centers are pointing to).
Regards,
Hossein Karimi
troubleshooting guidelines:
1. Check the Windows event log in the Enterprise Portal server to see
whether there are issues within a specific page.
2. If there is a report error, check the error log in the SQL Server
Reporting Services server for additional issues.
Access Issues
If users are having trouble accessing the Enterprise Portal or role centers, check
that the necessary SharePoint security is in place. Security for role centers relies
on Microsoft Dynamics AX 2012, Windows, and SharePoint security settings.
SSRS Report Changes not Visible in the Role Center
If you modify a report in Visual Studio, but the changes are not immediately
visible in the role center or Enterprise Portal, do the following:
1. In Microsoft Dynamics AX 2012, find the SSRS report in the AOT.
Right-click it and select Deploy.
2. When the deployment function runs, be sure to only select the Report
Library that you want to deploy.
3. The report(s) in the Library will be deployed to the Report Manager
and should be updated in the role center or Enterprise Portal when
the deployment is complete.
4. Start a fresh browser or Microsoft Dynamics AX 2012 session to
ensure that old reports are not being pulled from cache.
New Role Centers are Different from Other Role Centers
If you create a new role center, but it does not look similar to the existing role
centers, check that the following was performed:
• The Web Part Page was selected when you created the new
SharePoint webpage
• You selected Header, Footer, 3 Columns as the Layout Template
• You selected Enterprise Portal as the Document Library
New Role Center is Unavailable in the User Profiles Form
If you create a new role center, but it does appear in the role centers dropdown on
the User Profiles form, check the following:
• A new URL Web Menu Item has been created for the ASPX page.
• The URL's Home Page property is set to Yes.
Added Web Parts are not Visible to Other Users
If you insert additional web parts on a role center, but other users in the same role
do not see the changes, check the following:
• Web parts were added to the Shared Version of the web page, and
not the Personal Version.
• If the editing was done within the Content Pane in Microsoft
Dynamics AX 2012, it is possible that the Personal Version was
edited, which will not be seen by other users.
SSAS Components are Unavailable When Editing the Role Center
If you create or modify components in SSAS (for example, if you add a new KPI
to a cube), but the component is not available when you edit the role center (for
example, when trying to add the KPI to a Business Overview web part), check
the following:
• The changed object and all dependent objects, in the BI project are
deployed and processed.
• The BI project must be deployed to the correct OLAP database (in other words, the OLAP database that the Role Centers are pointing to).
Regards,
Hossein Karimi
+10 years of experience with hands-on lead-level background in the full life cycle of software development with demonstrated cross-functional team leadership skills.
Programming:
• ERP :Microsoft Dynamics AX 2012
• Language :X++, C#, C++, XAML, Asp.Net, Html, VB.Net, Android
• Environment : Windows XP, Windows 8, Windows 10, Windows Server
• DataBase : Oracle 9i,10g,11g and SqlServer and SQLlite
Create New Role Centers
Although Microsoft Dynamics AX 2012 ships with 34 role centers, there might
still be a requirement for a new role center to suit a particular role in your
business.
In the following procedure, you will create a new role center for the Chief
Information Officer (CIO) role:
1. In a browser, navigate to the Enterprise Portal.
2. Click on the Site Actions button and choose More Options.
3. The Create dialog box will open. Click Page under Filter By.
4. Choose the Web Part Page.
5. The New Web Part page will open. Enter a name for the new role center: EPCIORoleCenter.
6. Choose Header, Footer, 3 Columns as the Layout Template.
7. Choose Enterprise Portal as the Document Library.
8. Click Create. The new webpage will load.
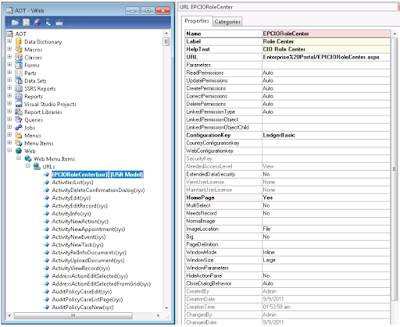
9. Create a URL object in Microsoft Dynamics AX 2012 to reference this new webpage. In the Microsoft Dynamics AX 2012 AOT, navigate to Web > Web Menu Items > URLs. Right-click the URLs node and select New URL.
10. Open the Properties window for the new URL and set its Name toEPCIORoleCenter.
11. Set the Label field to Role Center.
12. Set the Help Text field to CIO Role Center.
13. Set the URL field to the core of the URL. To do this, either use the Browse button, or copy the URL from the Address bar in the browser. Then, paste the URL into the URL field. Trim everything
that is not between the Enterprise%20Portal and aspx.
The URL property should look as follows:
Enterprise%20Portal/EPCIORoleCenter.aspx
14. Set Configuration Key to LedgerBasic.
15. Set Homepage to Yes.
16. Save the URL. The Properties should look as shown in the following figure.
17. Make a new user profile to relate to this role center. Navigate to System Administration > Common > Users> User Profiles. Create a new record.
18. Set the Profile ID field to CIO.
19. Set the Description field to Chief Information Officer.
20. Set the Role Center field to EPCIORoleCenter.
21. Assign the correct users to this profile with the Add User button. For testing purposes, assign your own user.
22. To test the new role center, simply exit and restart the Microsoft Dynamics AX 2012 client.
The Role Center will be completely empty. To start adding components to it,
open the Enterprise Portal in a browser and edit the Shared Version by using
SharePoint tools.
Regards,
Hossein Karimi
still be a requirement for a new role center to suit a particular role in your
business.
In the following procedure, you will create a new role center for the Chief
Information Officer (CIO) role:
1. In a browser, navigate to the Enterprise Portal.
2. Click on the Site Actions button and choose More Options.
3. The Create dialog box will open. Click Page under Filter By.
4. Choose the Web Part Page.
5. The New Web Part page will open. Enter a name for the new role center: EPCIORoleCenter.
6. Choose Header, Footer, 3 Columns as the Layout Template.
7. Choose Enterprise Portal as the Document Library.
8. Click Create. The new webpage will load.
9. Create a URL object in Microsoft Dynamics AX 2012 to reference this new webpage. In the Microsoft Dynamics AX 2012 AOT, navigate to Web > Web Menu Items > URLs. Right-click the URLs node and select New URL.
10. Open the Properties window for the new URL and set its Name toEPCIORoleCenter.
11. Set the Label field to Role Center.
12. Set the Help Text field to CIO Role Center.
13. Set the URL field to the core of the URL. To do this, either use the Browse button, or copy the URL from the Address bar in the browser. Then, paste the URL into the URL field. Trim everything
that is not between the Enterprise%20Portal and aspx.
The URL property should look as follows:
Enterprise%20Portal/EPCIORoleCenter.aspx
14. Set Configuration Key to LedgerBasic.
15. Set Homepage to Yes.
16. Save the URL. The Properties should look as shown in the following figure.

17. Make a new user profile to relate to this role center. Navigate to System Administration > Common > Users> User Profiles. Create a new record.
18. Set the Profile ID field to CIO.
19. Set the Description field to Chief Information Officer.
20. Set the Role Center field to EPCIORoleCenter.
21. Assign the correct users to this profile with the Add User button. For testing purposes, assign your own user.
22. To test the new role center, simply exit and restart the Microsoft Dynamics AX 2012 client.
The Role Center will be completely empty. To start adding components to it,
open the Enterprise Portal in a browser and edit the Shared Version by using
SharePoint tools.
Regards,
Hossein Karimi
+10 years of experience with hands-on lead-level background in the full life cycle of software development with demonstrated cross-functional team leadership skills.
Programming:
• ERP :Microsoft Dynamics AX 2012
• Language :X++, C#, C++, XAML, Asp.Net, Html, VB.Net, Android
• Environment : Windows XP, Windows 8, Windows 10, Windows Server
• DataBase : Oracle 9i,10g,11g and SqlServer and SQLlite
Create a Cue
To create a new Cue, use the Save As cue option on the Advanced Filter/Sort
function in the application:
1. To open the Advanced Filter/Sort function from a List page, either use File>Edit > Filter > Advanced Filter/Sort, use the Advanced Filter/Sort button on the toolbar, or press Ctrl+F3.
2. Once you have defined the query to be used, click Modify and then Save as cue.
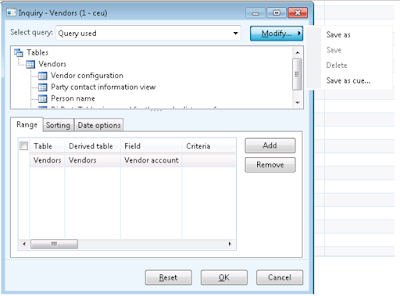
3. The Save as cue dialog box will appear.
4. Enter a Cue ID and Caption.
5. Adjust any of the other settings, if necessary.
6. Set any required security settings and click OK.
7. You can review or edit the cue at Basic > Setup > Role Center >
Edit Cues.
Since a new cue is only saved as a query in the database, you may want to save it
to the AOT Resources node to ensure that it can be exported/imported to other
application instances. To do this, use the Export > Export to AOT function on
the Edit Cues form.
Regards,
Hossein Karimi
function in the application:
1. To open the Advanced Filter/Sort function from a List page, either use File>Edit > Filter > Advanced Filter/Sort, use the Advanced Filter/Sort button on the toolbar, or press Ctrl+F3.
2. Once you have defined the query to be used, click Modify and then Save as cue.

3. The Save as cue dialog box will appear.
4. Enter a Cue ID and Caption.
5. Adjust any of the other settings, if necessary.
6. Set any required security settings and click OK.
7. You can review or edit the cue at Basic > Setup > Role Center >
Edit Cues.
Since a new cue is only saved as a query in the database, you may want to save it
to the AOT Resources node to ensure that it can be exported/imported to other
application instances. To do this, use the Export > Export to AOT function on
the Edit Cues form.
Regards,
Hossein Karimi
+10 years of experience with hands-on lead-level background in the full life cycle of software development with demonstrated cross-functional team leadership skills.
Programming:
• ERP :Microsoft Dynamics AX 2012
• Language :X++, C#, C++, XAML, Asp.Net, Html, VB.Net, Android
• Environment : Windows XP, Windows 8, Windows 10, Windows Server
• DataBase : Oracle 9i,10g,11g and SqlServer and SQLlite
Modify Personal Version of Role Centers
Until now, you have only modified the Shared Version of a role center. These
changes are seen by all users who view the role center. In some cases, a
particular user might need to personalize a role center for a personal reason. This
is possible by using the Personal Version in SharePoint. Consider a scenario
where a user in the Sales Manager role wants to add an extra cue to his or her
role center. Follow the steps in this procedure to add the cue:
1. In Microsoft Dynamics AX 2012, set your User Profile as the same
role that you need to modify. In this scenario, set it to Sales Manager
(System Administration > Common > Users> User Profiles> Add
User).
2. Close and reopen Microsoft Dynamics AX 2012; the Sales Manager
role center will display.
3. Click on the Personalize this Page link at the top right of the page.
The role center will reload in the SharePoint Edit Mode. However,
this time note that the Version is the Personal Version.
4. Click one of the Add a Web Part buttons. Choose the button in the
section that you want to add the web part to.
5. The Add Web Parts to <Section> dialog box will open. Select the
Cues web part and click Add. The new Cues web part displays in the
section that you added it to, in its default view.
6. Click on the web part Edit button and select Modify Shared web
part. The page will reload with the Properties window on the right.
7. Expand the dropdown button on the View field in the Cue 1 section.
This shows a selection of views that you can choose from.
These views do not have a direct relationship with views in the
Microsoft Dynamics AX 2012 Data Dictionary, but are actually
stored as resources in the AOT or queries in the database.
8. Choose the Backorder Lines view (cue). The caption and other fields
will default from the cue's saved caption property.
9. Click OK to save the web part.
10. The role center will reload and the new web part will now display the
Backorder Lines cue.
11. A cue web part can hold up to six cues. To add another cue to the
same web part, follow the previous steps, but change the Select a
Cue to Modify field to one of the other cue slots available.
12. Click Exit Edit Mode. The role center will reload.
Regards,
Hossein Karimi
changes are seen by all users who view the role center. In some cases, a
particular user might need to personalize a role center for a personal reason. This
is possible by using the Personal Version in SharePoint. Consider a scenario
where a user in the Sales Manager role wants to add an extra cue to his or her
role center. Follow the steps in this procedure to add the cue:
1. In Microsoft Dynamics AX 2012, set your User Profile as the same
role that you need to modify. In this scenario, set it to Sales Manager
(System Administration > Common > Users> User Profiles> Add
User).
2. Close and reopen Microsoft Dynamics AX 2012; the Sales Manager
role center will display.
3. Click on the Personalize this Page link at the top right of the page.
The role center will reload in the SharePoint Edit Mode. However,
this time note that the Version is the Personal Version.
4. Click one of the Add a Web Part buttons. Choose the button in the
section that you want to add the web part to.
5. The Add Web Parts to <Section> dialog box will open. Select the
Cues web part and click Add. The new Cues web part displays in the
section that you added it to, in its default view.
6. Click on the web part Edit button and select Modify Shared web
part. The page will reload with the Properties window on the right.
7. Expand the dropdown button on the View field in the Cue 1 section.
This shows a selection of views that you can choose from.
These views do not have a direct relationship with views in the
Microsoft Dynamics AX 2012 Data Dictionary, but are actually
stored as resources in the AOT or queries in the database.
8. Choose the Backorder Lines view (cue). The caption and other fields
will default from the cue's saved caption property.
9. Click OK to save the web part.
10. The role center will reload and the new web part will now display the
Backorder Lines cue.
11. A cue web part can hold up to six cues. To add another cue to the
same web part, follow the previous steps, but change the Select a
Cue to Modify field to one of the other cue slots available.
12. Click Exit Edit Mode. The role center will reload.
Regards,
Hossein Karimi
+10 years of experience with hands-on lead-level background in the full life cycle of software development with demonstrated cross-functional team leadership skills.
Programming:
• ERP :Microsoft Dynamics AX 2012
• Language :X++, C#, C++, XAML, Asp.Net, Html, VB.Net, Android
• Environment : Windows XP, Windows 8, Windows 10, Windows Server
• DataBase : Oracle 9i,10g,11g and SqlServer and SQLlite
Add Web Parts to a Shared Version of a Role Center
For the next procedure, consider a scenario where the purchasing manager has
asked that the agents in their team have an extra component in their role center.
The manager wants to see a KPI list in the right panel of the role center, above
the existing Purchase Return report. Additionally, the Accounts Payable
Turnover KPI from the General Ledger Cube needs to be visible. Follow this
procedure to add the web part:
1. Before opening the Enterprise Portal, in Microsoft Dynamics AX
2012, set your User Profile as the same role that you need to modify.
In this scenario, set it to Purchasing Agent (System
Administration > Common > Users> User Profiles > Add User).
2. In a browser, navigate to the Enterprise Portal. The role center for
your assigned role should load as the home page for your Enterprise
Portal session.
3. Click the Site Actions button, and choose Edit Page. The webpage
will load in Edit mode.
4. Navigate to the Right Column section. Click the Add a Web Partbutton.
5. The Add Web Parts dialog will open. Select the Microsoft
Dynamics AX category and select the Business Overview web part.
Click Add.
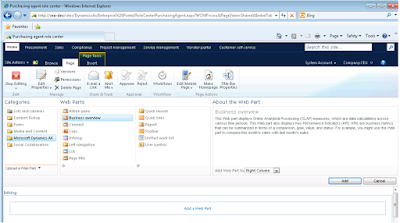
6. The new Untitled web part displays in the right column, in its default
view. Business Overview web parts have two modes: Business
Overview (Indicators) and KPI List. Business Overview is the
default view. Click on its Edit button and select Modify Shared
Web Part.
The page will reload with the Properties window on the right.
7. Select the new Business Overview web part and click Edit Web part from the web part menu. The Properties form displays in the right column.
8. Change Select Mode to KPI List.
9. Expand the Business Overview Setup group and set the Title Label property to Purchase Agent KPIs.
10. Click Apply and OK.
11. The page will reload; the new web part will have the name Purchase Agent KPIs.
12. Click the Add KPIs link in the web part.
13. The Add KPI dialog will appear.
14. Change Cube to General Ledger Cube.
15. Change KPI to Accounts Payable Turnover.
16. Check the Display Split by box.
17. Click OK.
18. Click Exit Edit Mode.
19. Open the Microsoft Dynamics AX 2012 client and confirm that the new web part is now visible in the Purchase Agent Role Center.
Regards,
Hossein Karimi
asked that the agents in their team have an extra component in their role center.
The manager wants to see a KPI list in the right panel of the role center, above
the existing Purchase Return report. Additionally, the Accounts Payable
Turnover KPI from the General Ledger Cube needs to be visible. Follow this
procedure to add the web part:
1. Before opening the Enterprise Portal, in Microsoft Dynamics AX
2012, set your User Profile as the same role that you need to modify.
In this scenario, set it to Purchasing Agent (System
Administration > Common > Users> User Profiles > Add User).
2. In a browser, navigate to the Enterprise Portal. The role center for
your assigned role should load as the home page for your Enterprise
Portal session.
3. Click the Site Actions button, and choose Edit Page. The webpage
will load in Edit mode.
4. Navigate to the Right Column section. Click the Add a Web Partbutton.
5. The Add Web Parts dialog will open. Select the Microsoft
Dynamics AX category and select the Business Overview web part.
Click Add.

6. The new Untitled web part displays in the right column, in its default
view. Business Overview web parts have two modes: Business
Overview (Indicators) and KPI List. Business Overview is the
default view. Click on its Edit button and select Modify Shared
Web Part.
The page will reload with the Properties window on the right.
7. Select the new Business Overview web part and click Edit Web part from the web part menu. The Properties form displays in the right column.
8. Change Select Mode to KPI List.
9. Expand the Business Overview Setup group and set the Title Label property to Purchase Agent KPIs.
10. Click Apply and OK.
11. The page will reload; the new web part will have the name Purchase Agent KPIs.
12. Click the Add KPIs link in the web part.
13. The Add KPI dialog will appear.
14. Change Cube to General Ledger Cube.
15. Change KPI to Accounts Payable Turnover.
16. Check the Display Split by box.
17. Click OK.
18. Click Exit Edit Mode.
19. Open the Microsoft Dynamics AX 2012 client and confirm that the new web part is now visible in the Purchase Agent Role Center.
Regards,
Hossein Karimi
+10 years of experience with hands-on lead-level background in the full life cycle of software development with demonstrated cross-functional team leadership skills.
Programming:
• ERP :Microsoft Dynamics AX 2012
• Language :X++, C#, C++, XAML, Asp.Net, Html, VB.Net, Android
• Environment : Windows XP, Windows 8, Windows 10, Windows Server
• DataBase : Oracle 9i,10g,11g and SqlServer and SQLlite
Modify the Shared Version of a Role Center
The following procedure shows how to modify the Shared Version of a role center. The scenario simply involves removing a certain component of a role center. The CEO of your company has asked you to remove the Production KPIs component from their role center because it is unused. The company also wants Customer KPIs to be moved above Financial KPIs.
1. Before opening the Enterprise Portal, in Microsoft Dynamics AX 2012, set your User Profile as the same role that you need to modify. In this scenario, set it to CEO (System Administration >
Common > Users> User Profiles> Add User).
2. In a web browser, navigate to the Enterprise Portal. The role center for your assigned role should load as the home page for your Enterprise Portal session.
3. Click the Site Actions button, and choose Edit Page. The webpage will load using edit mode.
4. Navigate to the Production KPIs web part. Click on the web part's Edit button, and choose Delete.

5. Confirm that you do want to delete the web part from the webpage. Deletions that are made in the Shared Version of a page will affect all users who navigate to this role center. For single-user role centers like CEO or CFO, this might be acceptable, but be careful when modifying multi-user role centers. You can confirm which version you are editing by checking the version in the Edit Mode header bar.
6. The webpage will reload with the newly modified layout.
7. Navigate to the Customer KPIs web part. Click on the web parts header bar and drag it above the Financial KPIs web part.
8. Click on Exit Edit Mode in the Edit Mode header bar. The webpage will reload with the newly modified layout.
In addition to moving or deleting existing web parts on a role center, it is also possible to add new web parts. SharePoint contains many web part categories that are specific to Microsoft Dynamics AX 2012. The following are of particular interest when dealing with role centers.
• Business Overview - these are the KPIs in the role center.
• Dynamics Report Server Report - web part that is used to display SSRS reports that are shipped with Microsoft Dynamics AX2012.
• Dynamics Unified Work List - lists of workflow items in the Role Center.
• Cues - graphical representations of Operational Indicators in the role center.
• QuickLinks - these links can point to a Microsoft Dynamics AX2012 menu item or an external web link such as www.bing.com.
Regards,
Hossein Karimi
1. Before opening the Enterprise Portal, in Microsoft Dynamics AX 2012, set your User Profile as the same role that you need to modify. In this scenario, set it to CEO (System Administration >
Common > Users> User Profiles> Add User).
2. In a web browser, navigate to the Enterprise Portal. The role center for your assigned role should load as the home page for your Enterprise Portal session.
3. Click the Site Actions button, and choose Edit Page. The webpage will load using edit mode.
4. Navigate to the Production KPIs web part. Click on the web part's Edit button, and choose Delete.
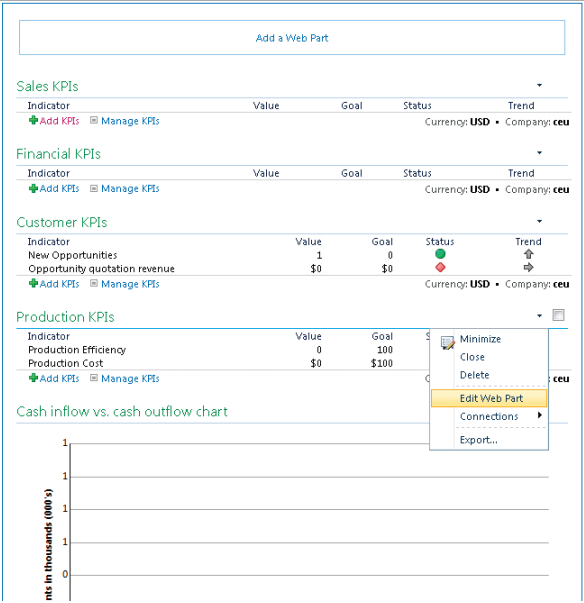
5. Confirm that you do want to delete the web part from the webpage. Deletions that are made in the Shared Version of a page will affect all users who navigate to this role center. For single-user role centers like CEO or CFO, this might be acceptable, but be careful when modifying multi-user role centers. You can confirm which version you are editing by checking the version in the Edit Mode header bar.
6. The webpage will reload with the newly modified layout.
7. Navigate to the Customer KPIs web part. Click on the web parts header bar and drag it above the Financial KPIs web part.
8. Click on Exit Edit Mode in the Edit Mode header bar. The webpage will reload with the newly modified layout.
In addition to moving or deleting existing web parts on a role center, it is also possible to add new web parts. SharePoint contains many web part categories that are specific to Microsoft Dynamics AX 2012. The following are of particular interest when dealing with role centers.
• Business Overview - these are the KPIs in the role center.
• Dynamics Report Server Report - web part that is used to display SSRS reports that are shipped with Microsoft Dynamics AX2012.
• Dynamics Unified Work List - lists of workflow items in the Role Center.
• Cues - graphical representations of Operational Indicators in the role center.
• QuickLinks - these links can point to a Microsoft Dynamics AX2012 menu item or an external web link such as www.bing.com.
Regards,
Hossein Karimi
+10 years of experience with hands-on lead-level background in the full life cycle of software development with demonstrated cross-functional team leadership skills.
Programming:
• ERP :Microsoft Dynamics AX 2012
• Language :X++, C#, C++, XAML, Asp.Net, Html, VB.Net, Android
• Environment : Windows XP, Windows 8, Windows 10, Windows Server
• DataBase : Oracle 9i,10g,11g and SqlServer and SQLlite
Modify Existing Role Centers
A role center is a customized "launch pad" for a user's experience inside Microsoft Dynamics AX 2012. It displays specific data, reports, alerts, and common tasks that are associated with the user's role. The role center is the first content that is displayed when a user logs in to either the rich client or the Enterprise Portal.
Microsoft Dynamics AX 2012 includes 34 customized role centers. A role center, in the most fundamental sense, is a webpage that can be viewed either in the Enterprise Portal or in the rich client Content Pane (which is essentially a browser window).
In the AOT, you can view the web components that make up each role center,just like any other webpage in the Enterprise Portal. The URL for the Role Center pages is found at AOT > Web > Web Menu Items > URLs.

Modify a Role Center
Just like any other webpage, role centers can be modified to suit the needs of your business. Since a role center is a webpage in the Enterprise Portal, and SharePoint manages webpage layout for the Enterprise Portal, any layout modifications need to be done by using SharePoint tools.
Just like all SharePoint webpages, there are also Shared Versions and Personal Versions of role centers. Shared and Personal versions are modified differently:
• Shared Versions are modified using SharePoint tools in a browser.
• Personal Versions are modified using SharePoint tools in the Microsoft Dynamics AX 2012 client.
Regards,
Hossein Karimi
Microsoft Dynamics AX 2012 includes 34 customized role centers. A role center, in the most fundamental sense, is a webpage that can be viewed either in the Enterprise Portal or in the rich client Content Pane (which is essentially a browser window).
In the AOT, you can view the web components that make up each role center,just like any other webpage in the Enterprise Portal. The URL for the Role Center pages is found at AOT > Web > Web Menu Items > URLs.

Modify a Role Center
Just like any other webpage, role centers can be modified to suit the needs of your business. Since a role center is a webpage in the Enterprise Portal, and SharePoint manages webpage layout for the Enterprise Portal, any layout modifications need to be done by using SharePoint tools.
Just like all SharePoint webpages, there are also Shared Versions and Personal Versions of role centers. Shared and Personal versions are modified differently:
• Shared Versions are modified using SharePoint tools in a browser.
• Personal Versions are modified using SharePoint tools in the Microsoft Dynamics AX 2012 client.
Regards,
Hossein Karimi
+10 years of experience with hands-on lead-level background in the full life cycle of software development with demonstrated cross-functional team leadership skills.
Programming:
• ERP :Microsoft Dynamics AX 2012
• Language :X++, C#, C++, XAML, Asp.Net, Html, VB.Net, Android
• Environment : Windows XP, Windows 8, Windows 10, Windows Server
• DataBase : Oracle 9i,10g,11g and SqlServer and SQLlite
Assign Users to Role Center Profiles
A user profile corresponds to a specific role in an organization, such as controller or chief financial officer. When you assign users to profiles, the role center that is set up for that profile is the role center that these users will see when they open the Microsoft Dynamics AX 2012 client or Enterprise Portal.
Before assigning users to profiles, you must select which profiles to use in each company. You can select additional profiles at any time.
• Verify that the profiles that you will be working with are listed in theUser profiles form.
• Create a list of users and their corresponding profiles.
Follow these steps to assign a user to a profile:
1. Click System Administration > Common > Users> User Profiles.
2. Select the profile that the user should be assigned to.
3. Select the user from the list.
4. Specify whether the profile applies to all the companies that a user is assigned to in Microsoft Dynamics AX 2012 or only specific companies.
a. If you select All companies, the user will be assigned to this profile for all companies and will see the same role center page for all companies.
b. If you choose Select companies, the user will be assigned to this profile only for the companies that you specify. You can assign the user to other profiles for other companies.
5. Click Apply to save changes. The users must restart the Microsoft Dynamics AX 2012 clients or refresh their web browsers to view their role centers.
Follow these steps to assign multiple users to a profile:
1. Click System Administration > Common > Users> User Profiles.
2. Select the profile that the users should be assigned to.
3. Click the Bulk Add Users button.
4. Select the users in the list. You can apply the filter to display the members from a specific user group.
5. Specify whether the profile applies to all the companies that each user is assigned to in Microsoft Dynamics AX 2012 or only specific companies.
6. Click Apply to save changes. The users must restart the Microsoft Dynamics AX 2012 clients or refresh their web browsers to view their role centers.
Regards,
Hossein Karimi
Before assigning users to profiles, you must select which profiles to use in each company. You can select additional profiles at any time.
• Verify that the profiles that you will be working with are listed in theUser profiles form.
• Create a list of users and their corresponding profiles.
Follow these steps to assign a user to a profile:
1. Click System Administration > Common > Users> User Profiles.
2. Select the profile that the user should be assigned to.
3. Select the user from the list.
4. Specify whether the profile applies to all the companies that a user is assigned to in Microsoft Dynamics AX 2012 or only specific companies.
a. If you select All companies, the user will be assigned to this profile for all companies and will see the same role center page for all companies.
b. If you choose Select companies, the user will be assigned to this profile only for the companies that you specify. You can assign the user to other profiles for other companies.
5. Click Apply to save changes. The users must restart the Microsoft Dynamics AX 2012 clients or refresh their web browsers to view their role centers.
Follow these steps to assign multiple users to a profile:
1. Click System Administration > Common > Users> User Profiles.
2. Select the profile that the users should be assigned to.
3. Click the Bulk Add Users button.
4. Select the users in the list. You can apply the filter to display the members from a specific user group.
5. Specify whether the profile applies to all the companies that each user is assigned to in Microsoft Dynamics AX 2012 or only specific companies.
6. Click Apply to save changes. The users must restart the Microsoft Dynamics AX 2012 clients or refresh their web browsers to view their role centers.
Regards,
Hossein Karimi
+10 years of experience with hands-on lead-level background in the full life cycle of software development with demonstrated cross-functional team leadership skills.
Programming:
• ERP :Microsoft Dynamics AX 2012
• Language :X++, C#, C++, XAML, Asp.Net, Html, VB.Net, Android
• Environment : Windows XP, Windows 8, Windows 10, Windows Server
• DataBase : Oracle 9i,10g,11g and SqlServer and SQLlite
Guidelines for Creating Role Centers
Microsoft Dynamics AX 2012 ships with 34 pre-defined user profiles. Microsoft
Dynamics AX users can be associated with any of these pre-defined profiles. It is
also possible to create additional user profiles to meet specific needs of users
within an organization.
In a role center, content is displayed inside SharePoint® web parts from a variety
of sources, as follows:
• Microsoft Dynamics AX
• Windows® SharePoint Services
• Microsoft® Office SharePoint Server 2007
The content should be specifically tailored for each role. Role centers in
Microsoft Dynamics AX should also meet the following criteria:• Simple and cleanly designed
• Simple to skim and read
• Aligned with the design guidelines
• Effortless to localize and customize
When creating a role center, follow these general guidelines:
• Identify the needs for a role. For example, consider the following:
o What information the role frequently needs to do the job
o Which information would help the role be more efficient at the job
• Create content around the role's needs.
• Determine the best web part to display for each type of content.
• Validate the value of the role center with real users who match the role.
Prioritizing the content is imperative for a great user experience. Make sure that
critical content such as activities, work lists, key charts, and other important
components are visible at first glance and are clearly organized.
Tailor the content to be useful at a glance. The most important content should be
immediately visible at a screen resolution of 1280 x 800, without scrolling.
Web parts provide different formats for displaying data. Follow these guidelines
when creating web parts:
• Web parts should be organized in two columns.
• There should be at least four and a maximum of 10 web parts.
• The title of each web part in a role center should be in sentence case.
• All web part content should be sized appropriately. There should be
no scrollbars in the web part. All the content should be visible by
default.
• To maximize the use of vertical space, there should be no filter
controls (quick and advanced filters) displayed in a web part that
contains a grid.
• No error messages should be displayed by default in the web part.
An activities part contains data that is related to a user's relevant activities. When
creating activities parts, ensure the following:
• The activities part should have a title name that does not contain the
word "Cues."
• Each stack in the activities part should navigate to the appropriate list
page when it is clicked and it should have the same filter applied.
When a user navigates to that list page, it should also have the same
name as the activities stack title.
• The recommended number of stacks is six or fewer.

Regards,
Hossein Karimi
Dynamics AX users can be associated with any of these pre-defined profiles. It is
also possible to create additional user profiles to meet specific needs of users
within an organization.
In a role center, content is displayed inside SharePoint® web parts from a variety
of sources, as follows:
• Microsoft Dynamics AX
• Windows® SharePoint Services
• Microsoft® Office SharePoint Server 2007
The content should be specifically tailored for each role. Role centers in
Microsoft Dynamics AX should also meet the following criteria:• Simple and cleanly designed
• Simple to skim and read
• Aligned with the design guidelines
• Effortless to localize and customize
When creating a role center, follow these general guidelines:
• Identify the needs for a role. For example, consider the following:
o What information the role frequently needs to do the job
o Which information would help the role be more efficient at the job
• Create content around the role's needs.
• Determine the best web part to display for each type of content.
• Validate the value of the role center with real users who match the role.
Prioritizing the content is imperative for a great user experience. Make sure that
critical content such as activities, work lists, key charts, and other important
components are visible at first glance and are clearly organized.
Tailor the content to be useful at a glance. The most important content should be
immediately visible at a screen resolution of 1280 x 800, without scrolling.
Web parts provide different formats for displaying data. Follow these guidelines
when creating web parts:
• Web parts should be organized in two columns.
• There should be at least four and a maximum of 10 web parts.
• The title of each web part in a role center should be in sentence case.
• All web part content should be sized appropriately. There should be
no scrollbars in the web part. All the content should be visible by
default.
• To maximize the use of vertical space, there should be no filter
controls (quick and advanced filters) displayed in a web part that
contains a grid.
• No error messages should be displayed by default in the web part.
An activities part contains data that is related to a user's relevant activities. When
creating activities parts, ensure the following:
• The activities part should have a title name that does not contain the
word "Cues."
• Each stack in the activities part should navigate to the appropriate list
page when it is clicked and it should have the same filter applied.
When a user navigates to that list page, it should also have the same
name as the activities stack title.
• The recommended number of stacks is six or fewer.
Regards,
Hossein Karimi
+10 years of experience with hands-on lead-level background in the full life cycle of software development with demonstrated cross-functional team leadership skills.
Programming:
• ERP :Microsoft Dynamics AX 2012
• Language :X++, C#, C++, XAML, Asp.Net, Html, VB.Net, Android
• Environment : Windows XP, Windows 8, Windows 10, Windows Server
• DataBase : Oracle 9i,10g,11g and SqlServer and SQLlite
Initialize Role Center Profiles
Role centers profiles must be initialized before they can be used. Use the following steps to initialize the role centers:
1. In Microsoft Dynamics AX 2012, click Organization Administration > Setup > Initialize role center profiles.
2. Select the Profile IDs to initialize.
3. Click OK.
You can create a user profile and corresponding role center page for Microsoft
Dynamics AX with the following procedure:
1. Identify the role center page that will be used for the user profile.
2. In Microsoft Dynamics AX, display the System Administration navigation pane.
3. In the Common group, click Users > User profiles to open the User profiles form.
4. Click New to create a new user profile.
5. Supply the Profile ID and Description for the user profile.
6. Select the role center page for the user profile.
7. Save the new entry.
8. If the new user profile is to be used with other Microsoft Dynamics AX installations, you must add it to the AOT. From the AOT, the user profile can be packaged for distribution to other Microsoft
Dynamics AX installations. To add the user profile to the AOT,select it in the list. Click Export and then click Export to AOT.
9. In the AOT, expand the Resources node. The new user profile will
be listed with the other user profiles. Its name will begin with Profile_.
A Role center should answer the following user questions:
• What is the workload?
• What needs to be done next?
• Are there urgent actions that must be completed?
• What is the status of the items of higher concern?
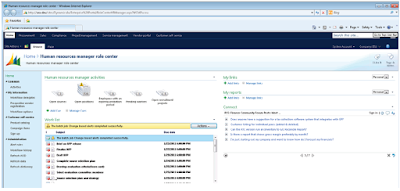
Regards,
Hossein Karimi
1. In Microsoft Dynamics AX 2012, click Organization Administration > Setup > Initialize role center profiles.
2. Select the Profile IDs to initialize.
3. Click OK.
You can create a user profile and corresponding role center page for Microsoft
Dynamics AX with the following procedure:
1. Identify the role center page that will be used for the user profile.
2. In Microsoft Dynamics AX, display the System Administration navigation pane.
3. In the Common group, click Users > User profiles to open the User profiles form.
4. Click New to create a new user profile.
5. Supply the Profile ID and Description for the user profile.
6. Select the role center page for the user profile.
7. Save the new entry.
8. If the new user profile is to be used with other Microsoft Dynamics AX installations, you must add it to the AOT. From the AOT, the user profile can be packaged for distribution to other Microsoft
Dynamics AX installations. To add the user profile to the AOT,select it in the list. Click Export and then click Export to AOT.
9. In the AOT, expand the Resources node. The new user profile will
be listed with the other user profiles. Its name will begin with Profile_.
A Role center should answer the following user questions:
• What is the workload?
• What needs to be done next?
• Are there urgent actions that must be completed?
• What is the status of the items of higher concern?

Regards,
Hossein Karimi
+10 years of experience with hands-on lead-level background in the full life cycle of software development with demonstrated cross-functional team leadership skills.
Programming:
• ERP :Microsoft Dynamics AX 2012
• Language :X++, C#, C++, XAML, Asp.Net, Html, VB.Net, Android
• Environment : Windows XP, Windows 8, Windows 10, Windows Server
• DataBase : Oracle 9i,10g,11g and SqlServer and SQLlite
Configure Enterprise Portal Security
In Enterprise Portal for Microsoft Dynamics AX, security is enforced by using a combination of features and services.
Once the Enterprise Portal website has been installed by default, only the administrator who installed Enterprise Portal can access the site. The configuration of security in Enterprise Portal involves verifying roles, enabling security features, and granting users access to the site. Information in the
following listings can help you configure Enterprise Portal security.
• Security tasks for the server and platform:
o Verify security settings for Internet Information Services (IIS) and Microsoft SharePoint 2010 products.
o Encrypt Enterprise Portal client-server communications by using Secure Sockets Layer (SSL). Configure Enterprise Portal to use Secure Sockets Layer
• Security tasks to enable user access:
o Verify that the Enterprise Portal site is registered in Microsoft Dynamics AX. Click System administration > Setup > Enterprise Portal > Web sites.
o Verify that Microsoft Dynamics AX role-based security is configured. At a minimum, users and groups must be members of the System user role.
o Grant users and groups permission to view the site in SharePoint.
o Grant users and groups access to Microsoft SQL Server Reporting Services (SSRS) reports. Users and groups must have this access to view SSRS reports in Enterprise Portal and Role Centers.
o Grant users and groups access to Microsoft SQL Server Analysis Services (SSAS) cubes. Users and groups must have this access to view SSAS reports in Enterprise Portal and Role Centers.
• Security tasks for extranet deployments:
o Enhance Enterprise Portal security in extranet deployments by using a traditional perimeter network.
o Specify user relations. User relations trim data based on a user's designated role and account. Additionally, they are required for extranet deployments and for an employee self-service portal.
o Configure Microsoft Dynamics AX for claims-based authentication.
Regards,
Hossein Karimi
Once the Enterprise Portal website has been installed by default, only the administrator who installed Enterprise Portal can access the site. The configuration of security in Enterprise Portal involves verifying roles, enabling security features, and granting users access to the site. Information in the
following listings can help you configure Enterprise Portal security.
• Security tasks for the server and platform:
o Verify security settings for Internet Information Services (IIS) and Microsoft SharePoint 2010 products.
o Encrypt Enterprise Portal client-server communications by using Secure Sockets Layer (SSL). Configure Enterprise Portal to use Secure Sockets Layer
• Security tasks to enable user access:
o Verify that the Enterprise Portal site is registered in Microsoft Dynamics AX. Click System administration > Setup > Enterprise Portal > Web sites.
o Verify that Microsoft Dynamics AX role-based security is configured. At a minimum, users and groups must be members of the System user role.
o Grant users and groups permission to view the site in SharePoint.
o Grant users and groups access to Microsoft SQL Server Reporting Services (SSRS) reports. Users and groups must have this access to view SSRS reports in Enterprise Portal and Role Centers.
o Grant users and groups access to Microsoft SQL Server Analysis Services (SSAS) cubes. Users and groups must have this access to view SSAS reports in Enterprise Portal and Role Centers.
• Security tasks for extranet deployments:
o Enhance Enterprise Portal security in extranet deployments by using a traditional perimeter network.
o Specify user relations. User relations trim data based on a user's designated role and account. Additionally, they are required for extranet deployments and for an employee self-service portal.
o Configure Microsoft Dynamics AX for claims-based authentication.
Regards,
Hossein Karimi
+10 years of experience with hands-on lead-level background in the full life cycle of software development with demonstrated cross-functional team leadership skills.
Programming:
• ERP :Microsoft Dynamics AX 2012
• Language :X++, C#, C++, XAML, Asp.Net, Html, VB.Net, Android
• Environment : Windows XP, Windows 8, Windows 10, Windows Server
• DataBase : Oracle 9i,10g,11g and SqlServer and SQLlite
Installing of Enterprise Portal and Role Centers
To install Enterprise Portal and role centers, use the Microsoft Dynamics AX
2012 Setup on a server that includes either Microsoft SharePoint Foundation
2010 or Microsoft SharePoint Server 2010. If you are installing other Microsoft
Dynamics AX components at the same time, the installation pages vary, based on
the components that you are installing.
1. Start Microsoft Dynamics AX Setup. Under Install, select Microsoft Dynamics AX components.
2. Advance through the first wizard pages.
3. If the Setup Support files have not yet been installed on the computer, the Select a file location page is displayed. The Setup Support files are required for installation. Enter a file location or
accept the default location, and then click Next. On the Ready to install page, click Install.
4. On the Select installation type page, click Custom installation and then click Next.
5. On the Select components page, select Enterprise Portal (EP) and then click Next.
6. On the Prerequisite validation results page, resolve any errors.When no errors remain, click Next.
7. On the Select a file location page, select the location where you want to install 32-bit versions of Microsoft Dynamics AX files and then click Next.
8. On the Specify a location for configuration settings page, specify whether you want Enterprise Portal to access configuration information from the registry on the local computer or from a shared
configuration file. If you select to use a shared configuration file, you must enter the network location of the file. Click Next.
9. On the Connect to an AOS instance page, enter the name of the computer that is running the Application Object Server (AOS) instance that you want to connect to. Optionally, you can specify the name of the AOS instance, the TCP/IP port number, and the WSDL port for services. Click Next.
NOTE: If you entered AOS connection information for other Microsoft Dynamics AX components that are installed on the computer that you are using, the Connect to an AOS instance screen is not displayed. Subsequent installations on the computer that you are using will reuse the existing AOS connection. All Microsoft Dynamics AX components installed on a computer must connect to the
same AOS instance.
10. On the Specify Business Connector proxy account information page, enter the password for the proxy account that is used by the .NET Business Connector. Click Next.
11. On the Configure a Website for Enterprise Portal page, select a website. If no websites are available in the list, you must cancel Setup, create a website by using SharePoint Central Administration, and then try the installation again. We recommend that you select the Configure for Windows SharePoint Services option. If you select this option, Setup verifies that the site is a SharePoint site. If not, Setup extends the site in SharePoint. Setup also sets the application pool to run under the service account and sets the authentication method to Windows NTLM.
NOTE: Note the following about the Create Website option: Clear this option if
you are installing Enterprise Portal for a public site, such as an unsolicited
vendor portal. For public sites, you must create the Enterprise Portal site by
using the public site template. If you are installing Enterprise Portal for a standalone installation, or on an administration server for a web farm, select theCreate Website option to create a site at the following URL:
http://ServerName/sites/DynamicsAX. Setup creates a new site that uses port 80.
When you install Enterprise Portal on subsequent servers in a server farm, you
must clear this option. The site must be created only on the administration server
for the web farm.
12. Click Next.
NOTE: If your business or organization purchased a developer license for Microsoft Dynamics AX, you can change the website's URL, title, and description before completing the installation. Modify the EPSetupParams file in the Application Object Tree (AOT) (Web > Web Files > Static Files >
EPSetupParams).
13. On the Prerequisite validation results page, resolve any errors. When no errors remain, click Next.
14. On the Ready to install page, click Install.
15. After the installation is complete, click Finish to close the wizard.
Regards,
Hossein Karimi
2012 Setup on a server that includes either Microsoft SharePoint Foundation
2010 or Microsoft SharePoint Server 2010. If you are installing other Microsoft
Dynamics AX components at the same time, the installation pages vary, based on
the components that you are installing.
1. Start Microsoft Dynamics AX Setup. Under Install, select Microsoft Dynamics AX components.
2. Advance through the first wizard pages.
3. If the Setup Support files have not yet been installed on the computer, the Select a file location page is displayed. The Setup Support files are required for installation. Enter a file location or
accept the default location, and then click Next. On the Ready to install page, click Install.
4. On the Select installation type page, click Custom installation and then click Next.
5. On the Select components page, select Enterprise Portal (EP) and then click Next.
6. On the Prerequisite validation results page, resolve any errors.When no errors remain, click Next.
7. On the Select a file location page, select the location where you want to install 32-bit versions of Microsoft Dynamics AX files and then click Next.
8. On the Specify a location for configuration settings page, specify whether you want Enterprise Portal to access configuration information from the registry on the local computer or from a shared
configuration file. If you select to use a shared configuration file, you must enter the network location of the file. Click Next.
9. On the Connect to an AOS instance page, enter the name of the computer that is running the Application Object Server (AOS) instance that you want to connect to. Optionally, you can specify the name of the AOS instance, the TCP/IP port number, and the WSDL port for services. Click Next.
NOTE: If you entered AOS connection information for other Microsoft Dynamics AX components that are installed on the computer that you are using, the Connect to an AOS instance screen is not displayed. Subsequent installations on the computer that you are using will reuse the existing AOS connection. All Microsoft Dynamics AX components installed on a computer must connect to the
same AOS instance.
10. On the Specify Business Connector proxy account information page, enter the password for the proxy account that is used by the .NET Business Connector. Click Next.
11. On the Configure a Website for Enterprise Portal page, select a website. If no websites are available in the list, you must cancel Setup, create a website by using SharePoint Central Administration, and then try the installation again. We recommend that you select the Configure for Windows SharePoint Services option. If you select this option, Setup verifies that the site is a SharePoint site. If not, Setup extends the site in SharePoint. Setup also sets the application pool to run under the service account and sets the authentication method to Windows NTLM.
NOTE: Note the following about the Create Website option: Clear this option if
you are installing Enterprise Portal for a public site, such as an unsolicited
vendor portal. For public sites, you must create the Enterprise Portal site by
using the public site template. If you are installing Enterprise Portal for a standalone installation, or on an administration server for a web farm, select theCreate Website option to create a site at the following URL:
http://ServerName/sites/DynamicsAX. Setup creates a new site that uses port 80.
When you install Enterprise Portal on subsequent servers in a server farm, you
must clear this option. The site must be created only on the administration server
for the web farm.
12. Click Next.
NOTE: If your business or organization purchased a developer license for Microsoft Dynamics AX, you can change the website's URL, title, and description before completing the installation. Modify the EPSetupParams file in the Application Object Tree (AOT) (Web > Web Files > Static Files >
EPSetupParams).
13. On the Prerequisite validation results page, resolve any errors. When no errors remain, click Next.
14. On the Ready to install page, click Install.
15. After the installation is complete, click Finish to close the wizard.
Regards,
Hossein Karimi
+10 years of experience with hands-on lead-level background in the full life cycle of software development with demonstrated cross-functional team leadership skills.
Programming:
• ERP :Microsoft Dynamics AX 2012
• Language :X++, C#, C++, XAML, Asp.Net, Html, VB.Net, Android
• Environment : Windows XP, Windows 8, Windows 10, Windows Server
• DataBase : Oracle 9i,10g,11g and SqlServer and SQLlite
Enterprise Portal Improvements Security and Search Improvements
Security and search features in the Enterprise Portal are improved.
• Kerberos Constrained delegation (KCD) is no longer required in a multi-box EP environment.
• Enterprise Portal automatically grants and denies access to data and webpages according to the role-based security framework in Microsoft Dynamics AX 2012. Before users can view data or
Enterprise Portal pages, administrators must configure role-based security.
• Microsoft Dynamics AX 2012 uses the SharePoint Business Data Connectivity Service (BCS) and SharePoint Search Server to provide a unified Enterprise Search experience for Enterprise Portal and the Microsoft Dynamics AX client. Microsoft Dynamics AX no longer includes the data crawler. All search administration is managed in SharePoint Search Server.
• Role center pages are now designed to load faster and to automatically refresh data when a page is loaded.
Regards,
Hossein Karimi
• Kerberos Constrained delegation (KCD) is no longer required in a multi-box EP environment.
• Enterprise Portal automatically grants and denies access to data and webpages according to the role-based security framework in Microsoft Dynamics AX 2012. Before users can view data or
Enterprise Portal pages, administrators must configure role-based security.
• Microsoft Dynamics AX 2012 uses the SharePoint Business Data Connectivity Service (BCS) and SharePoint Search Server to provide a unified Enterprise Search experience for Enterprise Portal and the Microsoft Dynamics AX client. Microsoft Dynamics AX no longer includes the data crawler. All search administration is managed in SharePoint Search Server.
• Role center pages are now designed to load faster and to automatically refresh data when a page is loaded.
Regards,
Hossein Karimi
+10 years of experience with hands-on lead-level background in the full life cycle of software development with demonstrated cross-functional team leadership skills.
Programming:
• ERP :Microsoft Dynamics AX 2012
• Language :X++, C#, C++, XAML, Asp.Net, Html, VB.Net, Android
• Environment : Windows XP, Windows 8, Windows 10, Windows Server
• DataBase : Oracle 9i,10g,11g and SqlServer and SQLlite
Enterprise Portal Improvements Installation and Deployment
The following improvements simplify the tasks of installing and deploying
Enterprise Portal and role centers:
• No compilation necessary: In earlier versions of Microsoft
Dynamics AX, you could not install Enterprise Portal on a server
with an incomplete initialization checklist. The installation failed
because the Enterprise Portal X++ classes were not previously
compiled on the server. You no longer have to compile these classes
to install and deploy Enterprise Portal.
• AXUpdatePortal utility: This feature improves deployment and
administration tasks. Additionally, with this utility you can deploy
Enterprise Portal on remote servers, create sites, and deploy changes
to existing sites.
• Enhanced AOT support for 32-bit clients: In earlier versions of
Microsoft Dynamics AX, administrators could not deploy changes to
Enterprise Portal from the Application Object Tree (AOT) on a 32-
bit client to a 64-bit Windows Server. In Microsoft Dynamics AX
2012, administrators can deploy changes from 32-bit clients to 64-bit
clients by clicking a button.
Regards,
Hossein Karimi
Enterprise Portal and role centers:
• No compilation necessary: In earlier versions of Microsoft
Dynamics AX, you could not install Enterprise Portal on a server
with an incomplete initialization checklist. The installation failed
because the Enterprise Portal X++ classes were not previously
compiled on the server. You no longer have to compile these classes
to install and deploy Enterprise Portal.
• AXUpdatePortal utility: This feature improves deployment and
administration tasks. Additionally, with this utility you can deploy
Enterprise Portal on remote servers, create sites, and deploy changes
to existing sites.
• Enhanced AOT support for 32-bit clients: In earlier versions of
Microsoft Dynamics AX, administrators could not deploy changes to
Enterprise Portal from the Application Object Tree (AOT) on a 32-
bit client to a 64-bit Windows Server. In Microsoft Dynamics AX
2012, administrators can deploy changes from 32-bit clients to 64-bit
clients by clicking a button.
Regards,
Hossein Karimi
+10 years of experience with hands-on lead-level background in the full life cycle of software development with demonstrated cross-functional team leadership skills.
Programming:
• ERP :Microsoft Dynamics AX 2012
• Language :X++, C#, C++, XAML, Asp.Net, Html, VB.Net, Android
• Environment : Windows XP, Windows 8, Windows 10, Windows Server
• DataBase : Oracle 9i,10g,11g and SqlServer and SQLlite
Subscribe to:
Posts (Atom)